CLICK HERE FOR FREE BLOGGER TEMPLATES, LINK BUTTONS AND MORE! »
Showing posts with label Christmas. Show all posts

12.06.2010

Sock Cupcake: FCCB Challenge #39 "Gifts Galore"!

I first made sock cupcakes almost a year ago...and I posted some of my first sock cupcakes in an earlier post back in February.  Well, I've been at it again!  This time I made them for Fantabulous Cricut's Challenge this week: "Gifts Galore": Create a handmade gift or gift package!  This has to be one of my most favorite gifts to give...and I made this one in Chrismas colors, just in time for the holiday!!!

For the cupcake wrapper, I have a Design Studio file graciously shared by Rach1Fun from the Cricut Messageboard.  You can find her blog HERE.  It uses the Plantin Schoolbook cartridge and cuts this lovely scallop-edge wrapper!  The socks are from the Michael's Dollar Spot and the cherries (which look almost black in the photo, but are really a dark red) are from Target.

To turn this cutie into a gift, I placed it in a cello bag, tied a red ribbon around it, and stamped a sentiment (CTMH) on a circle cut with George and attached to a circle tag to embellish.

Hope you'll hop over to FCCB and enter your own handmade gift/gift package for your chance to win this week's prize!

Happy Crafting!!!  :)

7.19.2010

Fantabulous Cricut Challenge #19: Christmas in July!

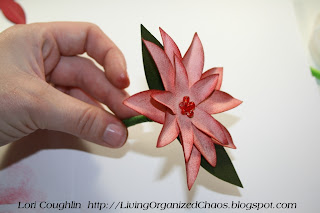
This week's Fantabulous Cricut Challenge is: Christmas in July!  We were asked to make a Christmas-themed project.  I decided to make a poinsettia "plant".  :)

I started from scratch on this one...so I decided to make up a little photo tutorial, in case anyone is interested!!!  Here we go:

Step 1:  Cut flowers from Accent Essentials.  Each flower is made up of three die-cuts, cut at 2 1/2", 3 1/4" and 3 1/2" ("Accent33" on shift mode).  Punch a very small hole in the center of each of the larger cuts.

Step 2:  Score petals and fold.  Using a bone folder or other scoring tool, make creases along each petal.  Gently fold up along the score lines.
Step 3:  Ink as desired.  I like lots of inking so I used a dark red to ink the red flowers, and a combination of medium and dark red on the pink flowers.
Step 4:  Attach flower centers.  I used Glossy Accents, and adhered yellow and red seed beads in clusters in the center of each of the smallest flowers.
Step 5: Attach pipe cleaners.  I cut each pipe cleaner into thirds.  I stuck one end through the small hole in the flower, bent over the top and attached it to the flower with a glue dot.
Step 6:  Layer remaining two flowers on top of large based flower with glue dots.  Bend up petals as you go for added dimension.
Step 7:  Attach leaves.  Cut "Accent26" at 4".  Cut it in half to form two sets of leaves.  Using a glue dot, attach one of the cut ends to the other cut end:
Step8:  Thread pipe cleaner through leaves, bend leaves as desired and wrap pipe cleaner with floral tape.
Step 9:  Make a "pot" of poinsettias by placing all of your poinsettia flowers into a pot filled with floral foam.  Hot glue if necessary.
Hope you enjoyed this project!  Be sure to head over to FCCB and look at the other fabulous Design Team projects!  You'll get in "Christmas Crafting Mode" for sure!  And don't forget about the FAB prizes up for grabs, including CRICUT CARTRIDGES!!!  :)

Happy crafting!

12.30.2009

Red/Black Snowflake "Thanks" Card

Each year, the day after Christmas, I get to work on my thank you notes for the wonderful and thoughtful gifts my family and I received over the holidays...this year I got started a couple of days late, but I finished them today and I'll be filling them out tomorrow and (hopefully) mailing them by Jan. 1.  Whew!!!  :)

These thank you's were made with the Magic Of The Season paper pack from Hobby Lobby.  I just LOVE the papers in this pack and the awesome black/red/cream color combo!  I used a cream card base, cut black cs slightly smaller than the base, and then cut the red snowflake pattern slightly smaller than the black cs (and inked the edges in black).  I cut a 1" x 5" strip of the cream snowflake pattern and used my scallop edge scissors to trim both sides (I inked the edges of this as well).  I adhered the strip in the middle of the card.

For the embellishment, I used the Home Accents Cricut cartridge and cut a snowflake at 2 1/2" out of black cs.  I used black glitter glue to cover the top outer edges of the snowflake, let that dry, and then layered a cream flower over it.  I used cream satin ribbon to tie a bow and stamped "Thanks" (CTMH "Thank You" #D1361) on each tail of the bow using black Staz-On ink (CTMH #Z888) and attached it to the snowflake/flower with a large black brad.

Thanks for looking!  :)

12.16.2009

Cupcakes, Cupcakes, Cupcakes!!!

Here's my latest "batch"!  The Mess Maker's preschool class went in on giftcards for both teachers for Christmas, and I was asked to make cupcakes to hold them!  I went with a red and green theme and this is the result:
I'm going to call these my Peppermint Cany Cane Cupcakes...  Hehehehe!  For directions on how to make these little cuties, please my original cupcake post, with a link to an online tutorial.

Thanks for looking!!!  :)

12.14.2009

Photo Tile Coasters With Vinyl

I made a set of photo coasters for each set of grandparents for Christmas (hope they're not checking my blog!)...
The photo of the second set is a little overexposed...they look more like the ones in the top photo.  :)

To make the coasters, I bought some smooth ivory travertine tiles from Home Depot.  I printed the photos onto tissue paper and Modge Podged them to the tiles.  I added two more coats of Modge Podge on top, tapping my foam brush over the surface so there weren't any brush stroke lines in the finish.

When dry, I added sentiments that were cut from black vinyl (using Home Decor and Home Accents cartridges).  Once adhered, I Modge Podged over the entire surface again.  Then I coated them with matte varnish (4-5 times each) and again tapped the brush over the surface to remove the brush stroke lines.  When dry, I hot glued cork to the back. 

The Mess Maker and Noise Maker will be giving/sending these to their grandparents for Christmas and the Mess Maker is REALLY excited!!!  :)

Thanks for looking!

12.13.2009

Accordion Gift Purses

I needed to make a fun combination birthday/Christmas gift for two of my BFFs and found some wonderfully aromatic rosemary bushes at my local grocery store.  So I decided to give them both a rosemary bush, with a little recipe holder and some recipes featuring fresh rosemary.

I was visiting Vicki over at Wizard's Hangout and she linked this amazing project idea and tutorial over at Stampin Inspirations!  It's made of just cardstock and patterned paper (plus a piece of sticky-backed velcro to hold it closed!  Super easy and super cute.  I also like the flower embellishment that Vicki linked to as well, at Wendy Smedley's Blog.  This combination was perfect for the recipe card holder!

I used some paper from My Mind's Eye and matted it with green/blue cardstock.  I used my Cricut to cut the 2" circles for the flower embellishment (George cartridge).  Then I just tied some coordinating ribbon on the handle and inserted the recipe cards.

P.S.  They loved them!  :)

Thanks for looking!!! 

Just Buggin Challenge #15: Christmas Garland

This week's Just Buggin Challenge #15 is called "Happy Holidays": Make a winter holiday or Christmas themed project!  I made a Christmas garland!

 I used Joys of the Season to cut the ornaments and flowers.  Then I used Accent Essentials to cut the white scalloped circles to mat the ornaments.  I used Winter Wonderland to cut the letters and added glitter glue to the accents within each letter.  To finish the ornaments, I punched a small hole in the bottom of each and added a silver Christmas charm (Making Memories). 

To attach the ornaments, I added silver glitter glue to mini clothespins and tied ribbons on them.  I used the clothespins to attach each oranament to the evergreen garland hanging on my mantle.

Thanks for looking!  :)

12.11.2009

Glitter Photo Ornaments

There are a TON of great tutorials out there on this project using the clear, round ornaments and I just had to try it on these cool square ones...which I originally bought to place these photos on and just fill with shredded paper!  This was one of the easiest, most fun and MESSIEST projects I've done!

Here's what you'll need:
1.  Pledge with Future Shine (it's a liquid floor wax that comes in a bottle from Wal-Mart, around $5)
2.  Plain, clear glass ornaments (I used these super-fun square ones from Hobby Lobby)
3.  Glitter in the color of your choice (I used the super-fine glitter)
4.  Embellishments for the outside (photo, photo frame) and ribbon

Take the silver top off the ornament.  Carefully pour a small amount of Pledge into the ornament, using enough to swish around and coat the enitre inside surface of the ornament.  Better to use too much than not enough!  Covering the opening of the ornament with a paper towel, swish the liquid around really well, making sure the entire inside surface of the ornament is wet.  Dump extra liquid back into bottle.  Make sure to get as much extra liquid out of the ornament as possible.

Next, take the glitter and pour it into the ornament (this is where I made my mess!!!...use a funnel!).  Covering the opening, shake the ornament around until the entire inside surface is completely covered with glitter.  You shouldn't be able to see through the ornament at all.  Dump the excess back into the glitter container.

Replace the top of the ornament and tie a bow.  Then embellish the outside of the ornament as deisred.  I cut the frame for my photo using Accent Essentials.  I cut it from white glitter paper, then added dimensional glaze to give it depth and shine (and to keep the glitter paper from making a big mess!).  Then I just used some more dimensional glaze to attach the frame and photo to the ornament.  That's it!

Thanks for looking!  :)

12.06.2009

Handmade Christmas Gift #3: Shine Ball

Ever heard of a "Shine Ball"???  Not me...until I saw this tutorial by the ladies of Highlowaha, over at Craftaholics Anonymous...the concept behind it is soooooo awesome:  "Inside everyone is a little SHINE.  Catch people in the act of shining and, together, we will make the world a brighter place."  How awesome is that?!?!?
The photo above is of my completed Shine Balls...one for my niece, one for my nephew.  The Mess Maker wants to give her cousins (who we'll be spending Christmas with) a gift and I think these are PERFECT!!!

Below, you can see just a few of the things that are wrapped up inside...there are several other things I didn't have any more duplicates of (kid's watch, exploding towelette, more candy, etc.).  All of these goodies were found at Dollar Tree:
How fun will it be for them to unwrap this entire ball, with little trinkets and surprises falling out as they go???  Wish I could have one!  :)

Thanks for looking!!!

Handmade Christmas Gift #2: Candy Bar Sliders

I'll admit I'd never heard of a candy bar slider until I saw this tutorial, linked by one of my favorite crafters, Kerry, at Kerry's Paper Crafts.  Man, can this girl get her craft on!!!  :)
These were inspired by a combination of two tutorials...once again, Dawn Griffth at Dawn's Stamping Thoughts (here) and also by Wanda at My Creative Corner (here).

Thse easy peasy candy bar sliders are made out of just a few pieces of cardstock, some adhesive and a length of ribbon and that's it!  Check out Dawn's step-by-step video tutorial to see how to put them together.

Yum yum...thanks for looking!!!  :)

Altered Paper Mache Gifts

I found these neat unfinished paper mache gifts with silver "bows" already attached at Hobby Lobby and they happened to be on sale at the time.  I inked and then covered them with this cute Christmas paper from Cloud 9 Design and then embossed some green cardstock strips for the "ribbon".  I Modge Podged everything for durability.

To complete the gifts, I cut two tags from TBBM and added a flourish and sentiment from Home Accents and Home Decor (Cricut).  I attached the tags to the gifts and put them on my coffee table as a centerpiece.

Thanks for looking!  :)

12.02.2009

Christmas "Lantern" Garland Out Of Plastic Cups!

I typically have a hard time falling asleep at night and it's usually because I've got "craft stuff" on my mind! I'm always thinking about projects and ideas for new creations. Ummm, I think I have an addiction! :)

Last night I thought of how I could "jazz up" the Christmas garland on my front door...it needed color and pop. I got to thinking that I have a bunch of those little clear, plastic punch cups left over from a party and figured I could cut a hole in the bottom of them to push onto the lights to make lanterns! So I got to work...

I took 12 cups and used my craft knife to slice an "x" in the bottom of each. Then I used my BFF, the Cricut, and cut snowflakes out of vinyl (Contact Paper!) at 1 1/2" and 2" using Accent Essentials and adhered them to the outside of each cup. Then I added 1/2" circles from George into the open spaces. To finish them up, I punched holes around the rim of each cup using my Crop-A-Dile and threaded red ribbon through and tied bows.
Then I just popped them randomly onto the string of lights already on the garland and ta-da!
Can't wait to see what these look like tonight...I'll post pics when I get them!

UPDATE:  Here is the night photo I just took....ooooooooh, ahhhhhhhhhh....  hehehe!
Thanks for looking!!! :)

11.14.2009

Just Buggin Challenge #11: Into The Wild

Here is my first project as a new DT member for Just Buggin!!!  Challenge #11 is called "Into The Wild": use a Cricut animal die cut on your project.  I LOVE LOVE LOVE this polar bear from JOTS and so this was an easy decision for me with the upcoming Christmas holiday! 

Supplies used:
1. Patterned paper and coordinating cardstock: Magic Of The Season Paper Pack (Hobby Lobby)
2. Polar bear die cut (with shadow and layer): Joys of the Season (Cricut)
3. Tag die cut: JOTS (Cricut)
4.  "Peace" (tag) and winter flourish (on bear body): stamps (CTMH)
5. Adhesive rhinestone: craft supply (Hobby Lobby)
6. Glitter glue (Hobby Lobby)
7. Glue pen (to coat stamps): Martha Stewart Crafts
8. Crushed velvet flocking (Doodlebug Designs)

This card was relatively easy to make.  I cut the polar bear, the shadow and the layer (scarf) and adhered them together.  Then I stamped the bear using glue on my stamp instead of ink and added flocking to it and heated with my heat gun...this added some extra detail and dimension.  I stamped "Peace" on the tag, added a rhinestone and adhered it to the scarf.  Then I attached the bear to the card base with foam dots.  To finish, I added bits of sparkle to the background paper with glitter glue.

Hop on over to Just Buggin and check out the other DT examples...there are some really great projects!!!
Thanks for looking!!!  :)

10.15.2009

My First Accordian Album From Scratch!


Closed and Tied

Partially Open

Fully Open
-----------------------------------------------

I will admit that I spend WAY too much time looking at crafting blogs and websites in my "free" time....and when I say "free" I mean using the time that I should be cleaning my house and doing laundry.  :) 

ANYWAY, I found THIS BLOG by Syrena and fell in love with these accordian albums, because they aren't the typical accordian albums you find everywhere.  I love the way Syrena angled the papers to give it the unique shape...the pages are on the diagonal (diamond shape) instead of the typical square/rectangle!

So I decided to try and figure it out on my own and I was actually able to re-create the album, though mine isn't as detailed as hers!  So here's what I did...using three sheets of cardstock, I scored each one in half both vertically and horizontally, to make four even squares.  Then I scored two squares diagonally (opposite of each other) on each piece of cs.  I folded the cs along all score lines.  Then I adhered all three sheets together, making sure the diagonal score marks were on the top and bottom of the layout.  I had to play around with folding it until I got it right.  It's hard to explain, but the two outer sheets kind of fold in toward the patterend paper side, and the middle sheet folds sort-of back toward the cs side.  I know that probably makes NO sense! 

To embellish, I matted each diamond with a piece of patterned paper...I used CTMH papers (Jingle Collection).  I added either layered strips of paper, photo corners (punch) or snowflakes (Cricut--AE) on each piece.  Then I added glitter glue to all the embellishments.  Thanks for looking!  :)