CLICK HERE FOR FREE BLOGGER TEMPLATES, LINK BUTTONS AND MORE! »
Showing posts with label Cricut-Accent Essentials. Show all posts

4.25.2011

Happy Birthday Banner Card

The inspiration for this card came from one in Paper Crafts Magazine (Jan/Feb 2011) HERE.
I used my Cricut and the George and Basic Shapes cartridge to make the banner, and the Accent Essentials cartridge to make the frame for the sentiment.  The sentiment is a stamp set from CTMH (Card Chatter-Birthday).

Thanks for looking!

11.29.2010

You Are My Sunshine Layout: FCCB Challenge #38--Ribbon!

I love ribbon...along with Cricut cartridges, it's an absolutely obsession!  I use it on almost every project I make.  So how fun is this week's Fantabulous Cricut challenge: Ribbon!?!?!?!  You can use any cartridge, any cut on any project...you just have to incorporate ribbon!  :)

For this layout, I used George to cut a 6" circle for the sun in the upper left corner.  I trimmed the sides to be flush with the page and punched holes along the bottom border to thread my ribbon into.  Both the ribbon and the strips of patterned paper mimic the sun's rays.

For the title, I used Storybook and used hot pink to make the shadow for each letter.  I also used Accent Essentials to cut the layers of the flowers.  I curled each petal, inked them, layered them together with a brad and then added a button (with ribbon!) for the center.

I used my CTMH Edge Distresser on almost every piece of this layout...so fun!  Gave it some fun texture, too.
  I also used my Autumn Terracotta ink (CTMH) to give everything an orange, "sunny glow"!

Hop on over to FCCB and link up your own Cricut ribbon project for your chance to win this week's prize!

Happy crafting!  :)

9.16.2010

Monkey Birthday Invitations!

A while back, I made some pink monkey birthday invitations for my niece, Avery, for her first birthday:
My friend Jen asked if I could make some Monkey invitations for her son's sencond birthday. Soooooo, I thought to myself, "why re-invent the wheel"??? I just modified the original pink one I did, and made them for a boy! I made them very similarly, using my Cricut "Create a Critter" for the monkey cuts and the "Accent Essentials" cartridge for the green accent that mats the sentiment.  The monkeys "swing" on the leaf ribbon added to the top of each card!  They're attached with little metal rings that allow them to move freely on the invitation.
I used the same patterned paper (Hobby Lobby) in blue instead of pink. Everything else is the same as on the pink ones. I made 20 of these bad boys. Whew! Hope she likes them... :)

Thanks for looking and have a creative day!

7.19.2010

Fantabulous Cricut Challenge #19: Christmas in July!

This week's Fantabulous Cricut Challenge is: Christmas in July!  We were asked to make a Christmas-themed project.  I decided to make a poinsettia "plant".  :)

I started from scratch on this one...so I decided to make up a little photo tutorial, in case anyone is interested!!!  Here we go:

Step 1:  Cut flowers from Accent Essentials.  Each flower is made up of three die-cuts, cut at 2 1/2", 3 1/4" and 3 1/2" ("Accent33" on shift mode).  Punch a very small hole in the center of each of the larger cuts.

Step 2:  Score petals and fold.  Using a bone folder or other scoring tool, make creases along each petal.  Gently fold up along the score lines.
Step 3:  Ink as desired.  I like lots of inking so I used a dark red to ink the red flowers, and a combination of medium and dark red on the pink flowers.
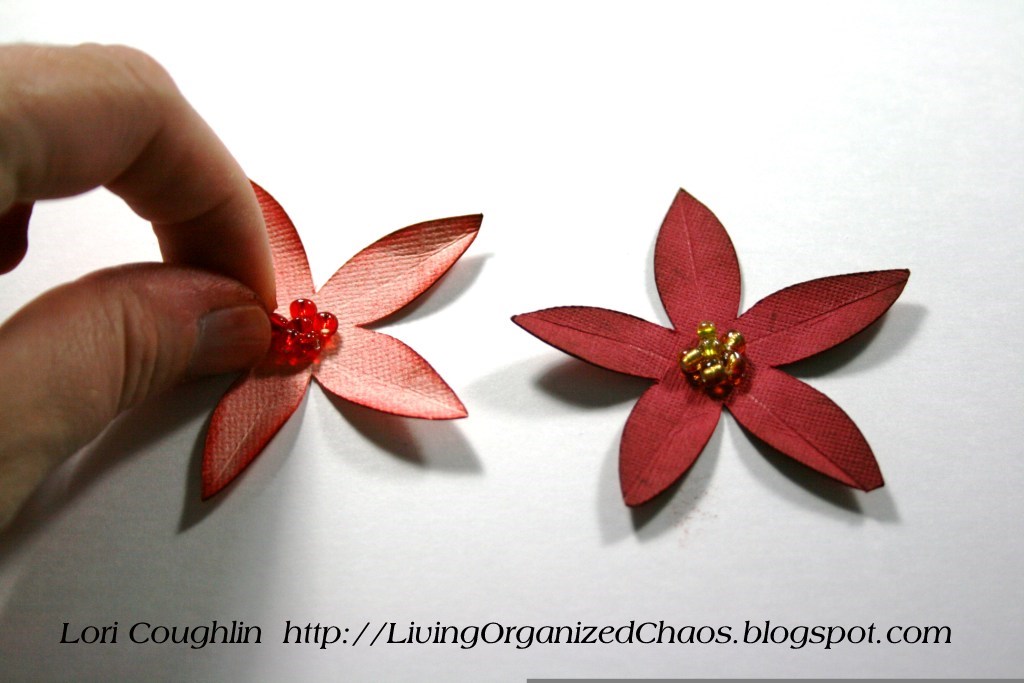
Step 4:  Attach flower centers.  I used Glossy Accents, and adhered yellow and red seed beads in clusters in the center of each of the smallest flowers.
Step 5: Attach pipe cleaners.  I cut each pipe cleaner into thirds.  I stuck one end through the small hole in the flower, bent over the top and attached it to the flower with a glue dot.
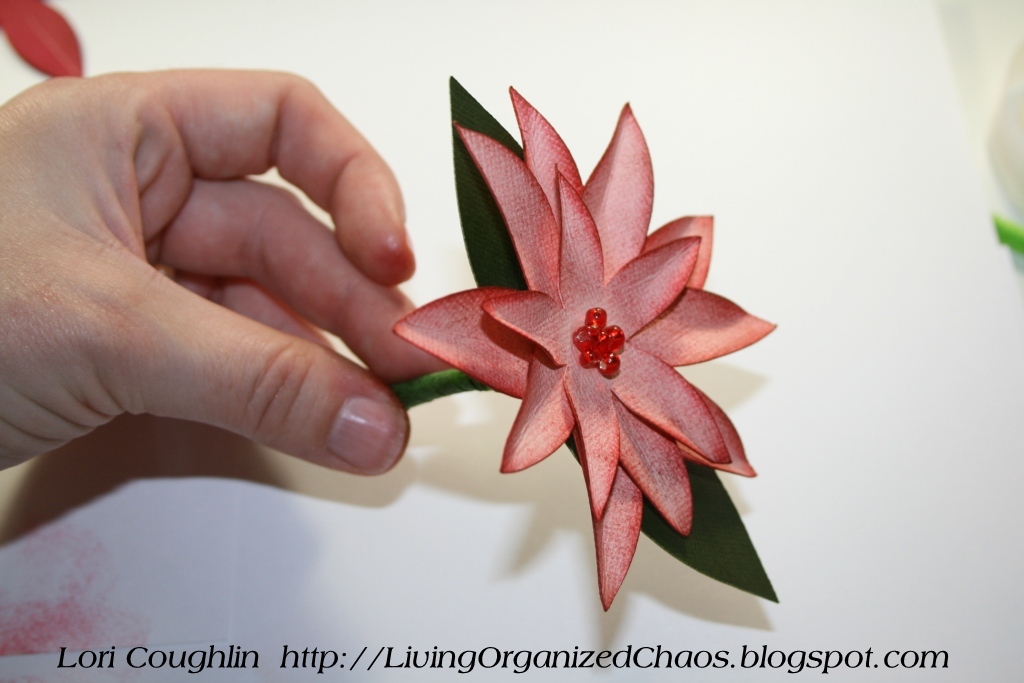
Step 6:  Layer remaining two flowers on top of large based flower with glue dots.  Bend up petals as you go for added dimension.
Step 7:  Attach leaves.  Cut "Accent26" at 4".  Cut it in half to form two sets of leaves.  Using a glue dot, attach one of the cut ends to the other cut end:
Step8:  Thread pipe cleaner through leaves, bend leaves as desired and wrap pipe cleaner with floral tape.
Step 9:  Make a "pot" of poinsettias by placing all of your poinsettia flowers into a pot filled with floral foam.  Hot glue if necessary.
Hope you enjoyed this project!  Be sure to head over to FCCB and look at the other fabulous Design Team projects!  You'll get in "Christmas Crafting Mode" for sure!  And don't forget about the FAB prizes up for grabs, including CRICUT CARTRIDGES!!!  :)

Happy crafting!

5.24.2010

FANTABULOUS CRICUT Challenge #11: Flowers For May...

This week's challenge at Fantabulous Cricut is "Flowers For May": use at least three flowers on a project.  I made this birthday cake box and added three dimensional flower accents!

For this project, I used the Tags, Bags, Boxes and More cartridge to cut the box and the small tag.  I used Accent Essentials to cut the scallop edge border and the flowers.

Each flower has 5 layers, cut at 2" (2), 1 1/2" (2) and 1" (1).  I embellished each flower by adding a rhinestone center and rolling the petals over my stylus to curve them.  I used a standard size hole punch to punch through the center of the pink flower, and just slid it down over the candle and glued in place.

To finish, I stamped "Happy Birthday" (CTMH), attached the tag with some narrow ribbon and adhered "snowball" pearls to the scallop edge.

Be sure to head over to FCCB for some fabulous Design Team projects and inspiration!

Have a creative day!!!  :)

5.14.2010

5x7 Recipe Books

I made these 5x7 recipe books using the CTMH My Creations Binder.  I covered them in CTMH Silhouette papers, then cut a marquee frame from Accent Essentials.  The letters for the titles were cut from Cursive 101.
I made a table of contents on the front insert in each binder with a list of the recipe categories (printed on my computer). 
This is an attempt to organize my TRILLIONS of recipe cards!!!  Now I can just get a bunch of 5x7 notecards, punch holes and stick recipes to them or write on them.  WHEW!  :)

Thanks for looking and have a creative day!  :)

4.27.2010

Paper Orchid


I found a tutorial by a really crafty lady named Tarah Faulkner on YouTube on how to make a paper orchid.  She cut the petals for each flower by hand and used cardstock to wrap  the stems.  Since I'm "busy" (read: "lazy") I decided to use my beloved Cricut to help me make one of my own!

For this project, I used the following Cricut cartridges and sizes for my flowers:
1.  Accent Essentials: Accent33 (+shift) at 4" for narrow petals
2.  Storybook: "B" (+shift, +Accent/Blackout) at 2" for wide petals
3.  Walk In My Garden: Leaf1 (+Blackout) at 1 1/4" for ruffled petal

Using the Cricut took only a fraction of the time it would have taken to cut these petals by hand.  Additionally, I did not attach each petal to a piece of floral wire, as was shown in the tutorial for this project. I simply curled each petal with my stylus and then hot glued them to the center piece (which is attached to floral wire).  And instead of using dampened cardstock strips to wrap the stems, I used floral tape!  This also cut my assembly time tremendously!

Hope you enjoy this project!  Have a creative day!!!  :)

3.20.2010

FCCB: Scrappin' Saturday Feature: Custom Shaped Mini-Albums

I am just so proud to be part of the awesome, super-talented group of designers over at Fantabulous Cricut (FCCB)!!!  And I am so excited to announce that Robin has put me in charge of the "Scrappin' Saturday" Daily Inspiration, which will be featured every Saturday at FCCB!

The topic for my first Scrappin' Saturday at FCCB is "Custom Shaped Mini-Albums"...did you know you can make these yourself???  With a little help from your Cricut, of course!  :)   I used the front and back of two ceral boxes in place of costly chipboard and used the George, Plantin, Accent Essentials and Walk In My Garden cartridges to cut the four different flower shapes (and patterned papers to cover each) at 6".  Here are some photos of my project:
Be sure to head over to FCCB to see my original post and information on how to make your own custom shaped mini-album.  And become a follower to make sure you don't miss any of the other great daily inspirations, including:

1.  Challenge Me Monday:  Weekly Challenge Revealed...play along with us!
2.  Quick Tip Tuesday: A great tip on using your Cricut is revealed
3.  Wednesday's Winners:  The winners from the previous week's challenge will be announced
4.  Thursday's Tutorials:  A fantastic weekly tutorial on a Cricut project
5.  Fantabulous Friday:  A wonderful themed Cricut project spotlight
6. Scrappin' Saturday:  Everything related to using your Cricut for scrapbooking

Don't those sound fun?!?!?  Now head on over to FCCB and check out this week's Daily Inspirations!

3.12.2010

Dimensional Paper Flowers

I made some paper flowers a few days ago for a wall hanging using instructions provided by Marta Gladden, but I decided to come up with some new varieties, for a special project that is currently in the works.  I didn't ink these or emboss them, as there are a LOT of them and I think that kind of detail would get lost with the project I'm using these for.  :)  If you want to see my project, check back in a day or two...I'll be posting photos.  :)

As always, I used my Cricut for these little guys:

Pink Rose (New Arrival)
Yellow Spider Mum (Accent Essentials):
White Spider Mum (Accent Essentials):
Red Star Flower (Stretch Your Imagination):
Coral Hibiscus (Storybook, Home Accents):
Yellow Daisy (Walk In My Garden, Stretch Your Imagination):
(didn't notice the hot glue string on this one until I photographed it...oops!)

The leaves are cut with Storybook.  These aren't hard at all, they just take a little patience.  Okay, a HUGE, TON, GOB of patience!  :)  But I think they're worth it.  Can't wait to finish my project...be sure to check back!

Thanks for looking and have a creative day!  :)

3.08.2010

Live-Laugh-Love Wall Hanging

The front of my fridge is not magnetic (why?  I have NO idea!)...so I wanted to make something to put on the front that would attach with a suction cup.  And this is what I came up with...a three-framed wall hanging showcasing one of my most favorite sayings:  "Live, Laugh, Love".
I found these square chipboard frames at Michaels in the paper mache and craft aisle.  I inked the edges and covered them with patterned paper that coordinates with my kitchen color scheme.  I hooked them together with some CTMH metal hinges and matted the openings with taupe cardstock.
I used the Cricut Home Accents cartridge to cut the words "live", "love" and "laugh" using the shadow feature for dimension.  I adhered them onto the taupe mats and then stamped a flourish in the open space.
The flowers are an idea by Marta Gladden, who posted her original flower designs on the Cricut messageboard.  She was kind enough to email the instructions to me and I got to work creating some of my own!
I used the following cartridges to create my flowers:  Walk In My Garden, Plantin Schoolbook, Accent Essentials and Storybook.  I cut several layers in various sizes, embossed them with my Cuttlebug, inked the edges and raised embossed designs and then curled the edges of the petals.  Then I attached the layers of each flower together with a brad.  The result is a very dimensional and beautiful paper flower!

To finish, I adhered a ribbon on the top, hot glued it to a suction cup and covered the top with another paper flower.  That's it!  Now I FINALLY have a fridge decoration!  :)
Thanks for looking and have a creative day!!!

3.03.2010

"Family" Mini Album In A Tin

This little tin contains a mini album!  I bought a bunch of these small, round tins at Michael's for a dollar each with the intent of putting some kind of goody in them and decorating the outside, then giving them as gifts.  But they've been sitting on my shelf for a while and so I decided to come up with something else to do with them.  And this is what I came up with!
I decorated the outside with a strip of patterned paper (CTMH Sweet Home) and then put a border sticker around the rim of the lid.  I attached layers of silk and paper flowers (paper flower cut with Cricut WIMG) and an adhesive pearl.  I cut a tag (Cricut George) and printed "Family" on it.
To attach the album string into the tin, I put the end of the ribbon through a hole in the center of a 1 3/4" circle (Cricut George) and used glue dots to stick it down.  Then I added circles on top and bottom of the ribbon for the "pages", leaving a loop of ribbon on the opposite end.
The white cardstock circles are cut at 2" and the patterned paper circles layered on top are cut at 1 3/4" (Cricut-George).  I embellished each page with a variety of elements:  1x1 mini photos of my family, scallop frame (Cricut-Accent Essentials), stamped hearts and sentiments (CTMH), silk flowers, paper flower (Cricut-George), half circles with Martha Stewart's Lace Border punch, brads, adhesive pearls and fibers tied to the ribbon between each page:
Here's a view with the pages all spread out:
This little cutie is going to sit on my living room table and hopefully resist being grabbed by little curious hands!!!  :)  Thanks for looking and have a creative day!

P.S.  I entered this project at:


The Trendy Treehouse

and: