CLICK HERE FOR FREE BLOGGER TEMPLATES, LINK BUTTONS AND MORE! »

7.27.2010

Total Scraplift! "Beach Babes" Layout

Here is a recent layout I made, based on one by (okay, totally scraplifted from) Monique at Monkeydoodlecricut ...why mess with perfection?!?!?...

Here is the original (by Monique Griffith):
I just loved the nostalgic feel of this layout, the color combo and the amazing detail, so I just had to re-create it myself.  I added one extra photo mat and used different papers, but I am happy with the results and can't wait to use it for our summer beach photos!

Thanks for the inspiration Monique!  :)

Thanks for looking and have a creative day!!!

7.26.2010

"Shabby Chic(kie)" & "Howdy Partner" Cards (FCCB)

Happy Monday!  It's time for another "Challenge Me Monday" over at Fantabulous Cricut...

I made two projects for this week's challenge:  Zoo/Animal themed project:
I'm calling this first card my "Shabby Chic(kie)" card...get it?!?!?  :)  Hee, hee...
And this little guy is my "Howdy Partner" horsie card.  LOVE this guy!

This week the returning DT members at FCCB got to play with the super-fun "Lots of Pun" stamp set, donated by JoysLife.com.  I chose the "Howdy Partner" and "Hey Chickie" sentiments.  I am a CTMH girl and typically don't use other brands of acrylic/polymer stamps.  But, WOW, was I impressed with these!  These are really great quality stamps and I really enjoyed working with them!  They gave nice, even impressions and the sentiments are just perfect for using with the Create a Critter cartridge!

For the chickie card, I used my Cricut Create a Critter cartridge (say that 10 times in a row!) for the nest, chickie, leaves and flowers.  I used George for the eyes (ovals).  These cards were my first attempt at using Melin's Face Tutorial over at Cooking With Cricut and I must say I am super-pleased with them!  Both of mine kind of look like they're looking up or rolling they're eyes at something, but hey...it's my first (and second) attempt so go easy on me!!!

For the "grunge" flowers, I cut three sizes of the flowers, sprayed them with Distress Ink (Antique Linen) and crumpled them.  Once un-crumpled, I dried them with my heat gun and added a pearl in the middle.  This idea came from Creations With ChristinaGo check out her tutorials...they're awesome!!!  I also decided to "grunge up" my leaves a bit, too...I sprayed them with my homemade CTMH faux "Glimmer Mist" and crumpled them.  I think they go better with the flowers like this.

The horsie card is also from Create a Critter and the eyes are ovals cut from George.  He's inked all over for detail and has another cute face based on Melin's tute.  Thanks again for the inspiration, Melin!!!  :)

Hope you'll head over to Fantabulous Cricut to see the other "Critter" and animal projects made by our super-talented Design Team this week!  Be sure to enter your own project for your chance to win this week's FAB prize!

P.S.  I have a VERY special "Scrappin' Saturday" coming up this Saturday, so tune into FCCB this coming Saturday and check it out!!!

Happy Crafting!

7.20.2010

Popsicle Cards!!!

These were so fun to make!  I found LOTS of examples of these on the web, all made with Stampin' Up stamps.  Since I'm a CTMH girl, I used CTMH's "You're Sweet" stamp set to make my own.  This was another project for my Hobby Lobby classes.

Each stamped image has glitter glue on top to give it some sparkle.  The bite mark is my favorite part!!!  I used my Cricut for the scallop circles, cut from Storybook ("I" in shift/blackout mode) at 1 3/4". 

Makes you want a cool treat doesn't it?
Have a creative day!!!  :)

"Tag-N-Flag" Mini Album

Here's another mini album...it's another "Tag-n-Flag" album, similar to the one I made a while back (HERE).  I love how these albums pop open to reveal every page at the same time!  This is one I taught at a recent class at Hobby Lobby.
Based on a design found here.

Have a creative day!  :)

7.19.2010

Fantabulous Cricut Challenge #19: Christmas in July!

This week's Fantabulous Cricut Challenge is: Christmas in July!  We were asked to make a Christmas-themed project.  I decided to make a poinsettia "plant".  :)

I started from scratch on this one...so I decided to make up a little photo tutorial, in case anyone is interested!!!  Here we go:

Step 1:  Cut flowers from Accent Essentials.  Each flower is made up of three die-cuts, cut at 2 1/2", 3 1/4" and 3 1/2" ("Accent33" on shift mode).  Punch a very small hole in the center of each of the larger cuts.

Step 2:  Score petals and fold.  Using a bone folder or other scoring tool, make creases along each petal.  Gently fold up along the score lines.
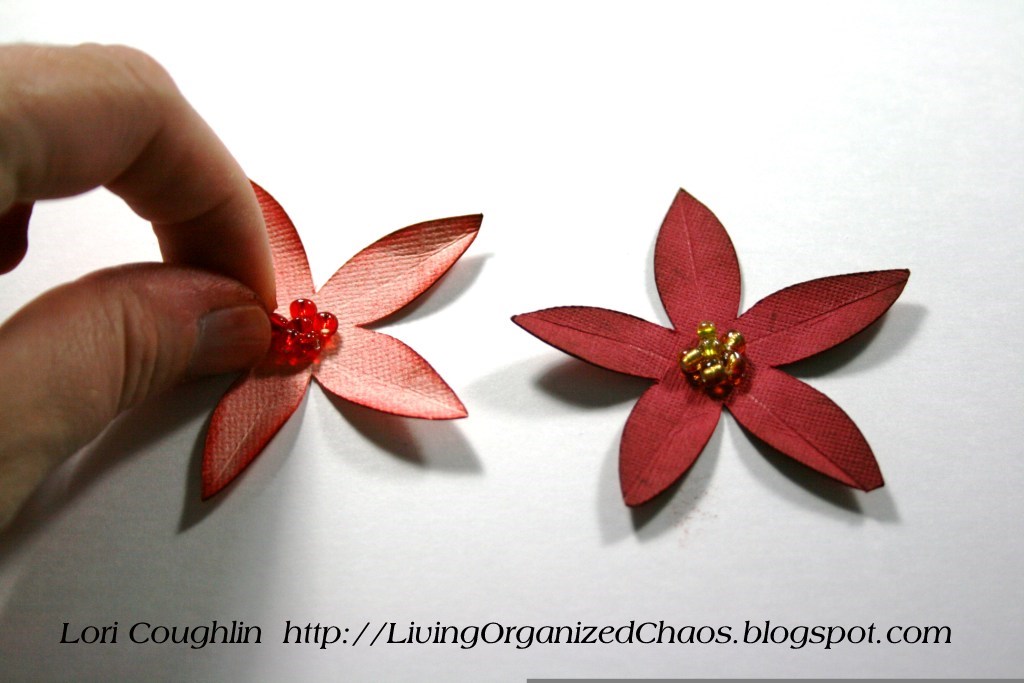
Step 3:  Ink as desired.  I like lots of inking so I used a dark red to ink the red flowers, and a combination of medium and dark red on the pink flowers.
Step 4:  Attach flower centers.  I used Glossy Accents, and adhered yellow and red seed beads in clusters in the center of each of the smallest flowers.
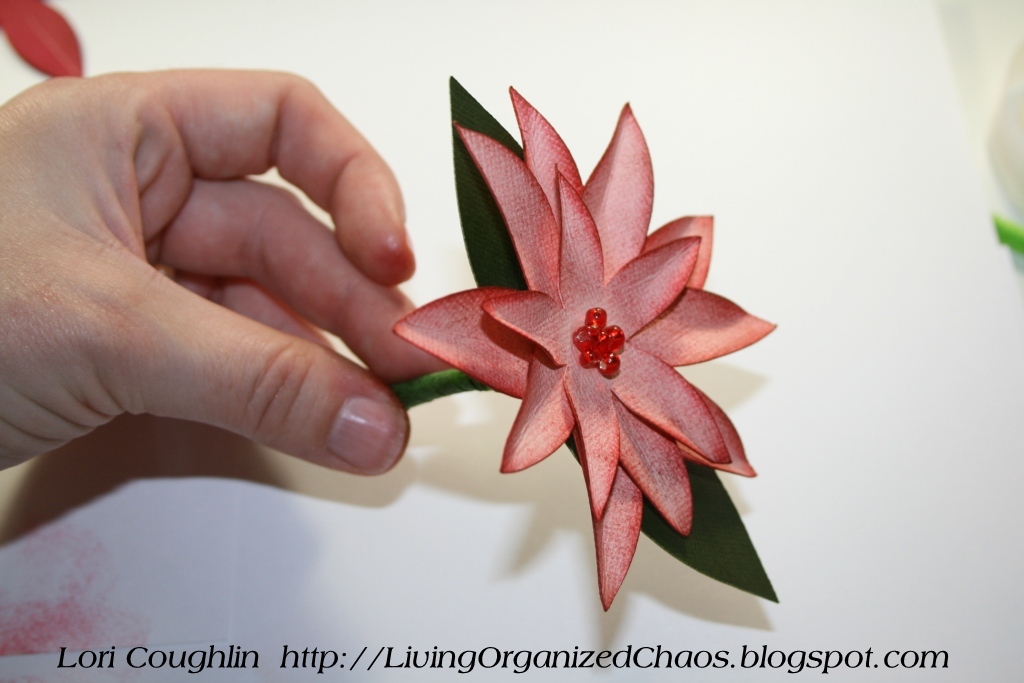
Step 5: Attach pipe cleaners.  I cut each pipe cleaner into thirds.  I stuck one end through the small hole in the flower, bent over the top and attached it to the flower with a glue dot.
Step 6:  Layer remaining two flowers on top of large based flower with glue dots.  Bend up petals as you go for added dimension.
Step 7:  Attach leaves.  Cut "Accent26" at 4".  Cut it in half to form two sets of leaves.  Using a glue dot, attach one of the cut ends to the other cut end:
Step8:  Thread pipe cleaner through leaves, bend leaves as desired and wrap pipe cleaner with floral tape.
Step 9:  Make a "pot" of poinsettias by placing all of your poinsettia flowers into a pot filled with floral foam.  Hot glue if necessary.
Hope you enjoyed this project!  Be sure to head over to FCCB and look at the other fabulous Design Team projects!  You'll get in "Christmas Crafting Mode" for sure!  And don't forget about the FAB prizes up for grabs, including CRICUT CARTRIDGES!!!  :)

Happy crafting!

7.12.2010

Fantabulous Cricut Challenge #18: Cool Treats!

The challenge this week over at Fantabulous Cricut is to make a "Cool Treat" shaped project.  I recently found an svg file for sale (here) and loved it, though I decided I wanted to make my own without using any software, just my Cricky (and without spending any moolah)!!!

I scoured my manuals until I got to Paisley and found a......paisley!  It's the scallop-edge paisley ("Accent") and I cut it in "Shadow/Word Shadow" mode.  The layers are cut at 8", 7" and 6".  I cut two layers in each size: one of solid cardstock and one of the patterned paper.  I adhered each of the same-size pieces together for sturdiness.

Then, using my paper trimmer, I trimmed the top pointed part off of each paisley, to leave a half watermelon shape.  I inked the edges, used my Bind-It-All to add a binding at the top and tied ribbons on the rings.  To finish, I added some threaded mini black buttons and the word "Smile" (Create a Critter) to the front.

I haven't added any photo mats or embellishments to the inside yet, until I figure out what I'm going to do with it!  Not sure if I'm going to give this one away or keep it...I'm thinking of keeping it for myself!  Wink, wink!

Hope you'll hop on over to FCCB and take a look at the rest of the AWESOME Design Team projects...they were surely inspire you to make a "Cool Treat" project!

Have a creative day!!!  :)

7.05.2010

Fantabulous Cricut Challenge #17: Creepy Crawlers!

This week's challenge at FCCB is "Creepy Crawlers":  Make a project using any type of bug AND use the color orange somewhere on your project.  Hmmmmmm.....I made a mushroom card!  Oh, and it has an orange butterfly!!!  :)

The mushroom is cut at 5" from Create a Critter (Cricut).  I inked the edges of each layer and added an extra brown layer in the back to make it a card (attached at the verey top with a thin strip of glue).  The butterfuly is cut at 2" and I added two layers, so that I could open up one wing for dimension.  The top wing is held on with mini foam dots.
To finish, I printed the sentiment "Hello" with my printer onto white cardstock, used a tag punch to punch it out, inked the edges and tied it on with orangy-brown ribbon.  That's it!

Hope you head over to FCCB and take a look at the FANTABULOUS Design Team projects.  They're sooooo cute!  Be sure to enter your own Creepy Crawler creation at FCCB to be eligible for this week's prize!!!

Have a creative day!  :)