CLICK HERE FOR FREE BLOGGER TEMPLATES, LINK BUTTONS AND MORE! »
Showing posts with label apparel. Show all posts

6.04.2010

Cricut Vinyl Stenciling On T-Shirts

I now have a uniform for my "job" as the Household CEO!!!
I've been wanting to try the "freezer paper" shirts for a while, so I gave it a try last night.  Except instead of using freezer paper and having to iron it, I just used some vinyl (white Contact paper).  I LOVE LOVE LOVE how it turned out!

Using Sure Cuts A Lot (SCAL), I cut out "The Household CEO" and a flourish in "Monotype Corsova" and "Wingdings" at 2 1/2".

A few tips that helped the process go smoothly:

1.  place a piece of cardboard or other material inside the shirt, between the front and back of the shirt, so the paint doesn't leak through to the back

2.  After placing the negative of the image/wording onto the t-shirt, use a clean brayer to roll over the entire image to ensure there aren't any bubbles or raised edges in the vinyl.

3.  Let each layer dry before applying more paint.  Let dry overnight before removing vinyl, to make sure all layers of paint are dry.

Because using Contact paper/vinyl worked so well, I probably won't try the freezer paper method.  But I hear it works well, too.

Thanks for looking and have a creative day!  :)

10.17.2009

Shrink Plastic Charm Bracelet-CTMH

I decided to try my hand (hah...no pun intented) at making a bracelet using shrink plastic charms!  Using my "You've Got Flair" stamp set from Close To My Heart, I stamped the images using Staz-On black ink onto shrink plastic (Hobby Lobby).  Then I turned the sheet over, colored the images using colored permanent markers (Hobby Lobby), then cut them out.  I used a mini hole punch to make a small hole in the top of each charm.

To shrink them, I used my heat gun (I protected my work surface by putting the pieces on a small cookie sheet with a pot holder underneath).  I held each one down with my craft tweezers and heated until it shrunk and became hard.  I let it cool, then lifted from the cookie sheet.

I bought a premade bracelet and little silver rings (Hobby Lobby) and attached the charms every four holes on the bracelet.  And that's it!  I love the personalized look it has and plan to make more.  I think my next one will be with some jumbo letter stamps, for the Mess Maker's teachers at preschool...  :)

I wonder if the Cricut markers would work on shrink plastic???  Off to the Cricut Message Board to find out...

9.24.2009

How To Make Hairbow Clips For Girls: Step-By-Step Tutorial


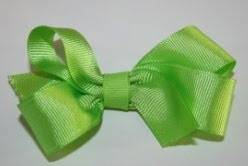
If you have little girls, you know how EXPENSIVE those little ribbon hair bows in the boutiques are.  And if you're like me, you turn up your nose at the ridiculous price tags and decide to do it yourself!!!  Since I've been asked many times how to make them, I thought I'd provide and easy step-by-step tutorial...keep in mind that this is how I do it, and it may differ somewhat from those that you see in stores (but it WILL look like the photo above):

To start, you will need the following supplies:
1.  About 18" of 7/8" grosgrain ribbon
2.  About 12" of coordinating 3/8" ribbon
3.  Metal Single Prong Clip (aka Alligator Clip)
4.  Craft Wire (I used 32 gauge)
5.  Scissors
6.  Hot Glue Gun

To make the hair bow:
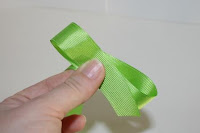
1.  Make a loop and hold it between your thumb and first finger:


2.  Wrap the ribbon back around to make a second loop of the same size and hold in place:


3.  Repeat the above step, placing the third loop to the side (diagonal) of the first loop:


4.  Make a fourth loop across (diagnoal) from the third loop and hold in place:
5.  Now using your thumb and first finger, pinch the center of the bow together:


6.  Now take a small length of craft wire and wrap it around the middle of the bow (where you are pinching it) and twist it like you are twisting a twist-tie on a bag of bread:
7.  Wrap the ends around the bow to hold the wire in place and make a nice tight pinch in the center of the bow:
8.  Set the bow aside.  Take the alligator clip and place a small drop of hot glue on the inside of the top part of the clip and glue down the end of the narrow ribbon.  Then add a thin line of glue along the length of the insde of the top part of the clip and glue the ribbon down:


9.  Place a thin line of hot glue along the opposite side of the clip, glue ribbon down and continue to place glue along the outide of the clip and gluing ribbon down, to completely cover the clip.  Trim excess ribbon off:


10.  Place a small drop of hot glue in the middle of the underside of the bow and glue bow to the center ofthe clip:


11.  Glue another small piece of narrow ribbon on the center of the bow to hide the wire.  When dry, wrap the ends around to the underside of the clip and glue ends in place.  Trim off excess ribbon:


12.  To finish, fluff bow and shape as desired.  That's it!  If you have any questions, please feel free to email me:  TheHouseholdCEO@live.com.  Thanks for looking!


7.14.2009

Craft: Cricut Design T-Shirts & Bag

Here is my latest craft project...t-shirts and a bag that I embellished with iron-ons that I cut with my Cricut machine! I used iron-on transfer paper (purchased at Office Depot) directly in my Cricut to create these designs:


This one is my fav! Love the sporty look it gave the plain gray t-shirt. I used the Graphically Speaking cartridge for the "old SCHOOL" logo, printed on plain white iron-on transfer paper:

This one was made with the Home Decor cartridge. I copied a piece of patterned paper onto the iron-transfer paper, then cut the design with the Cricut...gives it a "patterned" flourish instead of a plain white cut-out:

Here is one of the Mess Maker's plain pink t-shirts. I used the Home Decor cartridge again to make the bird cut-out on plain white iron-on transfer paper:

This is a plain canvas tote bag that I used the Accent Essentials cartridge for. I printed a red background onto the iron-on transfer paper, then cut out the frames from the red background. Then I printed a picture of the Mess Maker and the Noise Maker and cut them to fit inside the frames:
Hope you enjoy! :)