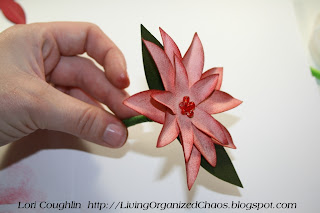
This week's Fantabulous Cricut Challenge is: Christmas in July! We were asked to make a Christmas-themed project. I decided to make a poinsettia "plant". :)
I started from scratch on this one...so I decided to make up a little photo tutorial, in case anyone is interested!!! Here we go:
Step 1: Cut flowers from Accent Essentials. Each flower is made up of three die-cuts, cut at 2 1/2", 3 1/4" and 3 1/2" ("Accent33" on shift mode). Punch a very small hole in the center of each of the larger cuts.
Step 2: Score petals and fold. Using a bone folder or other scoring tool, make creases along each petal. Gently fold up along the score lines.
Step 3: Ink as desired. I like lots of inking so I used a dark red to ink the red flowers, and a combination of medium and dark red on the pink flowers.
Step 4: Attach flower centers. I used Glossy Accents, and adhered yellow and red seed beads in clusters in the center of each of the smallest flowers.
Step 5: Attach pipe cleaners. I cut each pipe cleaner into thirds. I stuck one end through the small hole in the flower, bent over the top and attached it to the flower with a glue dot.
Step 6: Layer remaining two flowers on top of large based flower with glue dots. Bend up petals as you go for added dimension.
Step 7: Attach leaves. Cut "Accent26" at 4". Cut it in half to form two sets of leaves. Using a glue dot, attach one of the cut ends to the other cut end:
Step8: Thread pipe cleaner through leaves, bend leaves as desired and wrap pipe cleaner with floral tape.
Step 9: Make a "pot" of poinsettias by placing all of your poinsettia flowers into a pot filled with floral foam. Hot glue if necessary.
Hope you enjoyed this project! Be sure to head over to FCCB and look at the other fabulous Design Team projects! You'll get in "Christmas Crafting Mode" for sure! And don't forget about the FAB prizes up for grabs, including CRICUT CARTRIDGES!!! :)
Happy crafting!


.jpg)
9 comments:
WOW! Thanks for all the pics! I LOVE, how this turned out! I am going to have to give this a try!
This is Beautiful! Thank you for the tutorial!
your work is amazing as always.
wow beautiful.
Lori - this is beautiful!! Absolutely gorgeous!! Thanks so much for the pictures too!
Lori, this is a fantastic project! Your poinsettias are just gorgeous!
I wanted one as soon as I saw it in the picture thing so I am so glad for the tutorial. I used one of your tutorials on a future FCCB project. This is a great place to come and learn!
Amazing and beautiful. Thanks so much for the tutorial. Love your projects :)
This is gorgeous! Thanks so much for the tutorial. I don't use this cartridge too much and it's nice to see a project done with it.
This is absolutely georgeous, thanks for posting how, I will have to try this!
Post a Comment