CLICK HERE FOR FREE BLOGGER TEMPLATES, LINK BUTTONS AND MORE! »

1.31.2011

"Support The Cause" FCCB Challenge #45

This week's challenge at Fantabulous Cricut is called "Support The Cause"...create a project in honor of a cause that's near and dear to your heart.  This card is a breast cancer awareness card.  I recently had to purchase a new Cricut Expression (the LED screen on my other one went out) and I found the pink one with the "Pink Journey" exclusive cartridge included.  Hadn't had a chance to use it until this project!

I cut the ribbon and shadow, the scallop oval, and the "Hope" sentiment from Pink Journey.  I used a scrap of pink/brown butterfly paper I had in my stash for the card mat.  I popped the ribbon and oval sentiment with foam dots and added a butterfly mirror I had in my embellishment drawer.  

Hope you'll head over to FCCB and enter your own "Support The Cause" project for your chance to win this week's prize!  :)

Happy Crafting!!!

1.23.2011

Kitchen Makeover....PROGRESS!!!

Thank you again to those of you out in Blogland that voted for my aunt and uncle to win the $30,000 Dream Kitchen Makeover, given away by one of their local TV stations!!!
(Original post can be found HERE)

They won (thanks to an amazing number of votes!!!) and the makeover is in progress!  Thought I'd share some of the photos my uncle sent me on what the kitchen looks like now.  It's not completed (as you'll see), but it should be done in about a week or so.  I'll definitely show you the final result. 
Are you ready for this???  :)

Before...notice the lovely green, uh, I mean "avocado" countertops with coordinating wall paper:
During the "demolition":
My uncle and my dad, "supervising"...keep in mind that they are the premiere experts in anything having to do with home building/remodeling/fixing, having been "secured" up on the roof to help their grandfather re-roof the house when my dad was only 4 years old:
The damage...I guarantee you my dad and my uncle kept some of this scrap material for little "projects" they want to complete:
AND, the current condition of their kitchen...TOTALLY 100% empty:
They're making coffee in the bathroom, storing food in the dining room and appliances in the office.  They're troopers, I tell ya!  But I know they'll think it was well worth it when they get their dream kitchen!

More to come...stay tuned!  :)

Winner, Winner, Chicken Dinner!

Sorry for the delay in posting the winner of the FAB CTMH blog candy for answering my question: "What should I do with this???" (see post HERE)

This was the Blog Candy up for grabs:
I loved all of your ideas...but since things have been a little crazy lately, I've yet to actually put the rack into use.  Soooooo, I don't have any photos yet.  But when I do get around to using it, I'll post the pics!

And now for the winner....
Nancy Watson said:
"So funny! My husband would not have gone to the dumpster for me
as he is mortified that I dumpster dive! But, I can't tell you how many things
I have been able to get to organize our house with that way.

Anyway, my first thought when I saw this is if you put down some cardboard on the
 shelves you have the perfect place for storing your GlimmerMist.
However, this would also work for re-inkers and ink pads (as I have one and
that is what I use mine for). Also, you could get those tiered spice shelve things
 and put one on each shelf and store your wood stamps on this too.

Have fun with whatever you do!

THANKS Nancy!  I have a TON of re-inkers and ink pads and I think this would be a great solution!
Please contact me at the email address below to claim your prize!

TheHouseholdCEO (at) live (dot) com

1.17.2011

Wedding Cake Card: Fantabulous Cricut "Sweet Shop" Challenge

This week's challenge at Fantabulous Cricut is called "Sweet Shop": create a project incorporating some type of sweet...cake, ice cream, candy, etc.  YUM!!!

My Design Team project is a black & white wedding cake card.  I love black and white for wedding projects.  I used a white card base, with a black swirl lace cardstock for the mat.  I cut three sizes of black/white patterned papers into rectangles and matted them with white cardstock.

I adhered them to the card with foam dots for dimenstion.  I tied a narrow white ribbon around each cake layer and then added a three-layered flower over each knot.  The flowers were cut with George & Basic Shapes at 3/4", 1" and 1 1/4".  The centers are red pearl brads (Eyelet Outlet).  To finish, I stamped the word "love" onto white cardstock using CTMH ink/stamp, inked the edges in red and adhered with foam dots.

Now I just need to find someone that's getting marries to send this to!!!  :)  Hope you'll play along with this week's "Sweet Shop" challenge at FCCB.  You can make any-themed project for any season or holiday, just make sure to incorporate something sweet & yummy on it!

Happy Crafting!

1.09.2011

What Should I Do With This??? (BLOG CANDY!!!)

You know the saying, "One man's trash is another man's treasure"???  Well, it's true.  And I'm living proof...

Sunday is "doughnut day" in our family and we go get doughnuts at the doughnut shop and coffee from Starbucks.  Anyway, this morning when we pulled up in the drive-thru line at Starbucks (because there is ALWAYS a line), I happened to look over at the dumpster and see this perfectly good wire rack sitting next to it.  Why would they throw out a perfectly good rack?!?!?

The Household CFO was not excited about this, but hung his head in shame anyway and went to get this beauty out of the trash for me, right in front of everyone in line.  Now THAT's love I tell ya!  :)

I just know I have the perfect use for it...I just don't know what it is at the moment.  Sooooooo, I'm asking for your help.  And, for helping me out, I'm offering up some yummy
BLOG CANDY!!!
Contents (all CTMH): two mini stamp sets, 1 sheet of textured stickers, 1 package of "sweet leaf/colonial white" embellishments and 1 package of ""twilight/colonial white" embellishments.

All you have to do is give me an idea of what to use this storage rack for. 
If I choose your idea, you win.  It's that simple!  Please leave a comment below by this Friday, January 14 to be eligible.

Good luck, and I'm looking forward to hearing your creative storage ideas!  :)

The Mess Maker Turns Four!

We had a party at My Gym for the Mess Maker's fourth birthday this weekend...she had a blast!
She LOVED the ball pit and spent the majority of the party in it with friends, but I think the highlight for her (judging from her face anyway) was the "birthday motorcycle"...
She wanted a "Dora" theme (surprise, surprise), so we had Dora balloons, Dora serveware and Dora cupcake toppers...that pink icing is going to show up later, I just know it!  :)
The Noise Maker had a blast, too!
Thank you to everyone who helped celebrate with us and make her birthday so much fun and so special!

1.03.2011

Snowflake Card: Fantabulous Cricut "Snowy Delights" Challenge!

This week's challenge at Fantabulous Cricut is called "Snowy Delights": create a project incorportaing snow or snowflakes!  Perfect for this time of year, don't ya think?

For this mini card, I used a scrap of pink/blue patterned paper that reminded me of snowflakes for the mat on the front of the card.  Using my NEW Winter Lace cartridge (LOVE IT!), I cut the snowflake and shadow at 3".  I ran the cream layer through my Xyron and sprinkled glitter all over for some sparkle (which unfortunately doesn't show up well in the photo).  To finish, I tied a sheer pink ribbon around the center of the snowflake and added a blue pearl brad before adhering the layers together and adding the snowflake to my card.

It may be cold, but this little snowflake card makes me all warm and cozy!  :)  Hope you'll play along with this week's Snowy Delights challenge at FCCB...head over and check out the prizes up for grabs! 

Happy Crafting!  :)

12.29.2010

Dora Birthday Cake and Party!

Me: "What kind of cake do you want for your birthday?"
The Mess Maker: "Dora."
Me: "What kind of Dora cake?"
The Mess Maker: "PRINCESS!!!"

Can I tell you how HARD it is to find Princess Dora birthday party supplies?????  Luckily, it wasn't hard to make a Princess Dora cake which I think made the Mess Maker not notice the fact that all of the princess-themed decor wasn't actually Dora!

To make this cake, I used the Pampered Chef Batter Bowl.  One cake mix is baked directly in the bowl and then inverted.  I baked another cake mix in two 9" round cake pans.  I stacked the round layers, placed the dome layer on top and placed a Dora doll on the top. 

I iced it in pink (it HAD to be pink!) and then added fondant flowers I cut with some flower-shaped cookie cutters and sprayed with edible food coloring spray.  Super-simple and yummy!  Oh, and the cake was PINK (of course!)...strawberry.  Mmmmmmm....

BLOG CANDY WINNER!!!

Wow, we had a FANTABULOUS Crawl over at FCCB and we thank everyone for "crawling" along with us and entering your own projects in the challenge!

I apologize this post is a "little" late...okay, a LOT late!  With the holidays and traveling, etc. I completely forgot to post my winner!

Using Random.org, my winner is.....
#39 Joanne!!!
Joanne said, "What an adorable way to showcase your family! So cute! Oh, and I can't wait to try your cookie recipe, they look so yummy!"

Thanks, Joanne!  Please contact me at the email address below with your mailing address so I can send you your CTMH Felicity Kit!  You have two weeks to claim your prize!

TheHouseholdCEO (at) live (dot) com

12.13.2010

Fantabulous Cricut Deck The Halls Crawl!

Welcome to Organized Chaos and the third Fantabulous Cricut Crawl...Fantabulous Cricut's version of a blog hop!

In honor of the approaching Christmas holiday, we're having a
"Deck The Halls" Crawl!

Each Design Team member will be featuring an original Christmas/Holiday-themed project to decorate and spruce up their homes for the Holiday Season!

If you've come from visiting Leinad at Scrap-Stickle-Pop, you're in the right place! If you've just happened across my blog and would like to play along with our Fantabulous Cricut Crawl, start HERE.

Make sure to check out each DT member's blog for some awesome inspiration! There will be PRIZES along the way at our DT members' blogs, AND there will be a Grand Prize up for grabs at FCCB for one participant that submits a "Deck The Halls" project at FCCB!

How fun is that?  :)

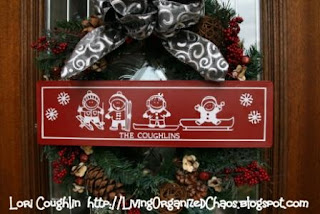
For my project...I made a sign for the wreath on my front door:
I recently got the new Car Decals cartridge and I've been wanting to make a little family sign for our house.  Since it's Christmas time, I decided to make a Winter-themed sign for my Winter wreath, to jazz it up a little!  The red sign came from Hobby Lobby last year in the Christmas section.  It was 50% of $5.00 at the time.  I used Cricut white vinyl to cut the winter characters (using the "Athlete" feature) from Car Decals at 2 1/2" and 3".  The snowflakes came from Joys of the Season, cut at 1".  The lettering is from Lyrical Letters, cut at 1/2".  It was super-simple to do and I just love the result!

Okie dokie, now for the details of the prize I'm giving away...

CTMH's "Felicity" Collection!
This set is valued over $30 and is no longer available!  It includes 3 color schemes, 6 pieces of double-sided decorative die cut papers, 6 pieces of double-sided beautiful patterned paper and an exclusive, and a full-size stamp set that includes flourishes, flowers, birds and an entire alphabet!

To be eligible to win this prize, you must:
1.  Be a follower of my blog, Organized Chaos.
2.  Leave a comment on this post telling me your MOST favorite cartridge (only one!) and why it's your "must have" cartridge!

That's it!  Easy peasy!  Now it's your turn! Let's see your Christmas/Holiday-Themed Decor projects! Make sure to include a Cricut cut somewhere on your project!  And make sure to link up your project to FCCB no later than Sunday at midnight for chance to win the Grand Prize!

Next stop...Melin's blog, Cooking With Cricut. Go see what she has in store for you today... it's sure to knock your "stockings" off.  HAHAHAHAHAHA!
Happy Crawling!

12.11.2010

Yummy, Yummy, To My Tummy...COOKIES!!!

I made these super-yummy Chocolate Andes Cookies for a cookie exchange party last night with the girls...soooo fun!  They turned out really good and were really simple to make, so I'm sharing the recipe for anyone interested. 

The recipe originally came from Jackie Schmidt at AllRecipes.com:

Chocolate Andes Cookies
Ingredients:
3/4 C butter
1 1/2 C brown sugar
2 T water
2 C semi-sweet chocolate chips
2 eggs
1 1/2 C flour
1 1/4 tsp. baking soda
1/2 tsp. salt
2 (4.5 oz.) packages of Andes mints

Directions:
1.  In a saucepan, cook sugar, butter and water until melted.  Remove from heat and stir in chocolate chips until melted.  Remove from heat and let cool 10 minutes.

2.  Pour chocolate mixture into large bowl and beat in eggs, one at a time.  Combine flour, baking soda and salt and stir into chocolate.  Cover and refrigerate dough at least 1 hour.

3.  Preheat oven to 350 degrees.  Grease cookie sheets.  Roll cookie dough into walnut sized balls and place 2 inches apart on cookie sheets.

4.  Bake for 8 minutes in the oven.  When cookies come out of oven, press one Andes mint into the top of each cookie and let sit 1 minute.  When mint is soft, swirl with the back of a spoon to make a pattern with the green filling of the candy.

5.  Let cool.  Makes approx. 40 cookies.

Enjoy!  :)

12.08.2010

Custom Christmas Gift Tags!

My friend Tommie, "The Seriously Sweet Party Expert" at OhMyGluestick! designs adorable party circles for any occasion or holiday you can think of...including Christmas.  I would normally use these as cupcake toppers attached to candy sticks, but since I'm not making cupcakes for the holidays, I decided to make gift tags out of them.

Now I don't know about you, but I think some of the stick-on type labels are kind-of tacky (not all, but most!).  Unless I shell out the bucks for them, they're usually cheapo and have somewhat of a glossy surface, which then makes my ink smear and look awful!  Unfortunately, they are absolutely necessary to keep the gifts going to right recipients!  :)

So here's the perfect solution:  use printed party circles and attach them to bows to make your own custom, perfectly-coordinating gift tags!  The set I used for these projects are from the Red & Green Holiday Set:
Aren't these super-cute?  There are several other holiday options available at the OhMyGluestick Etsy shop as well.

I used a 1 3/4" circle punch to punch out the circles, leaving a bit of the printed border surrounding the circles.  Then I used my Cricut (Storybook cartridge) to cut 2" scallop circles to mat the printed circles.  I used a cardstock from my scrap stash and made these little cuties for nearly nothing!  And the best part is that my writing (on the back of each tag) didn't smear a bit because I was able to write on mat cardstock!  :)

I also added tags to these little gift bags (20 for $1.00 in the $1 bins at Target) which hold The Mess Maker's handmade Christmas ornaments to give to family this Christmas:
Thanks for looking and have a creative day!

12.06.2010

Sock Cupcake: FCCB Challenge #39 "Gifts Galore"!

I first made sock cupcakes almost a year ago...and I posted some of my first sock cupcakes in an earlier post back in February.  Well, I've been at it again!  This time I made them for Fantabulous Cricut's Challenge this week: "Gifts Galore": Create a handmade gift or gift package!  This has to be one of my most favorite gifts to give...and I made this one in Chrismas colors, just in time for the holiday!!!

For the cupcake wrapper, I have a Design Studio file graciously shared by Rach1Fun from the Cricut Messageboard.  You can find her blog HERE.  It uses the Plantin Schoolbook cartridge and cuts this lovely scallop-edge wrapper!  The socks are from the Michael's Dollar Spot and the cherries (which look almost black in the photo, but are really a dark red) are from Target.

To turn this cutie into a gift, I placed it in a cello bag, tied a red ribbon around it, and stamped a sentiment (CTMH) on a circle cut with George and attached to a circle tag to embellish.

Hope you'll hop over to FCCB and enter your own handmade gift/gift package for your chance to win this week's prize!

Happy Crafting!!!  :)

12.01.2010

Looking For Help With A "Helmet Therapy" Insurance Appeal?

The Mess Maker and the Noise Maker were both born with Torticollis, a tightening in the neck muscles on one side, which made it difficult for them to fully rotate their heads.  Both went through rounds of Physical Therapy to treat the disorder, but the Mess Maker (above) ended up having to wear a special helmet for several months to correct the abnormal head shape that resulted from sleeping mainly on one spot of her head (see below).
This process was ubelievably difficult, stressful, time-consuming and heart-breaking...especially the casting part of the experience (which probably upset me more than her!):

And the worst part of the whole ordeal was fighting with our insurance company.  They wouldn't cover the costs of Helmet Therapy, claiming it was only "cosmetic" in nature.  We were out $3,000 for this much needed device.

I spent months researching and gathering information for an appeal.  A lot of people I came in contact with in similar situations had been denied coverage by their insurance companies as well.  I was determined to get coverage, and was able to compile an unbelievable amount of resources supporting the medical necessity of Helmet Therapy, which I turned into a 250-page successful appeal packet.  I would be happy to share this information with anyone interested.

1.  My 10-page appeal letter (entire document can be found HERE).


2.  If you would like a copy of my appeal resources and information, please email me your mailing address and I'll mail you a CD with all of the information I used.

TheHouseholdCEO(at)live(dot)com

If you have been denied coverage for a Star Band, DOC Band, Hanger Band or any other type of Helmet Therapy by your insurance company, don't give up!

11.29.2010

You Are My Sunshine Layout: FCCB Challenge #38--Ribbon!

I love ribbon...along with Cricut cartridges, it's an absolutely obsession!  I use it on almost every project I make.  So how fun is this week's Fantabulous Cricut challenge: Ribbon!?!?!?!  You can use any cartridge, any cut on any project...you just have to incorporate ribbon!  :)

For this layout, I used George to cut a 6" circle for the sun in the upper left corner.  I trimmed the sides to be flush with the page and punched holes along the bottom border to thread my ribbon into.  Both the ribbon and the strips of patterned paper mimic the sun's rays.

For the title, I used Storybook and used hot pink to make the shadow for each letter.  I also used Accent Essentials to cut the layers of the flowers.  I curled each petal, inked them, layered them together with a brad and then added a button (with ribbon!) for the center.

I used my CTMH Edge Distresser on almost every piece of this layout...so fun!  Gave it some fun texture, too.
  I also used my Autumn Terracotta ink (CTMH) to give everything an orange, "sunny glow"!

Hop on over to FCCB and link up your own Cricut ribbon project for your chance to win this week's prize!

Happy crafting!  :)