CLICK HERE FOR FREE BLOGGER TEMPLATES, LINK BUTTONS AND MORE! »
Showing posts with label Home Decor. Show all posts

11.03.2011

Thirty Days of Thankfulness Tree

A bunch of my friends are doing the "Thirty Days of Thankfulness" challenge, and I wanted to participate, too!  This little project lets my whole family take part and my hope is that it will really help us concentrate on being thankful this month.

This project is super-simple and SUPER-cheap!  I found a vase in my cabinet and filled with little pumpkin vase filler (Target $1 spot).  I collected dead branches from the back yard and put them in the vase.  And the rest was done with my Cricut and about 12 pieces of carstock!  The banner was cut from the Wild Card cartridge at 15".  I ran it through my printer to get the text and then inked the edges.  The leaves were all cut from the Doodlecharms cartridge at 3 1/2' and 4".  Each family member has a different color, and one leaf for each day of the month.  I punched holes in the stems and used twine to make loops to hang them.

The tree is a little bare right now (we'll do day 3's leaves tonight at dinner), but just wait until the end of the month!  I'll post a follow-up pic to show how beautiful our Fall Thankful Tree will be!

I'm thinking you could adapt this to work with different seasons or holidays activity...
1. Fall tree with colored leaves for Thanksgiving
2. Christmas tree with ornaments at Christmas
3. Eggs on tree for Easter
4.  Hearts on tree for Valentines
5. Flowers on tree for Spring
Might have to get crackin' on the Christmas one!!!

Thanks for looking and have a creative day!

9.20.2011

Bird-Themed Luncheon Table

I'M BACK!!!!!!!
Wow, it's been a while since I posted, and I do apologize for the long hiatus...moving to a new home took over my life for a bit, but things seem to be settling down (finally!) and I'm back in the crafting mode!  :)

Recently, I volunteered to host a table at our annual mom's group luncheon.  Each "hostess" plans a theme for her table and decorates with whatever she wants.  I chose "birds" because I have a slight obsession with them!  Here's another pic:
The "tree" in the middle looks a little lopsided in the picture for some reason, but didn't look that way in person!?!?  Why am I posting this on my crafty blog?  Because I used my BFF Cricut to make a lot of the little embellishments on the table of course!
These little favor bags are just tulle bags from Hobby Lobby, filled with birdseed and tied.  I used my Storybook Cartridge "D (+shift+shadow)" for the bird base and "D (+shift)" for the top layer of the bird.  I ran the birds through my printer after cutting them to print "Thank You" on them.  You can see my tutorial on how to do this HERE.  Then I just hot glued them to the little bag!
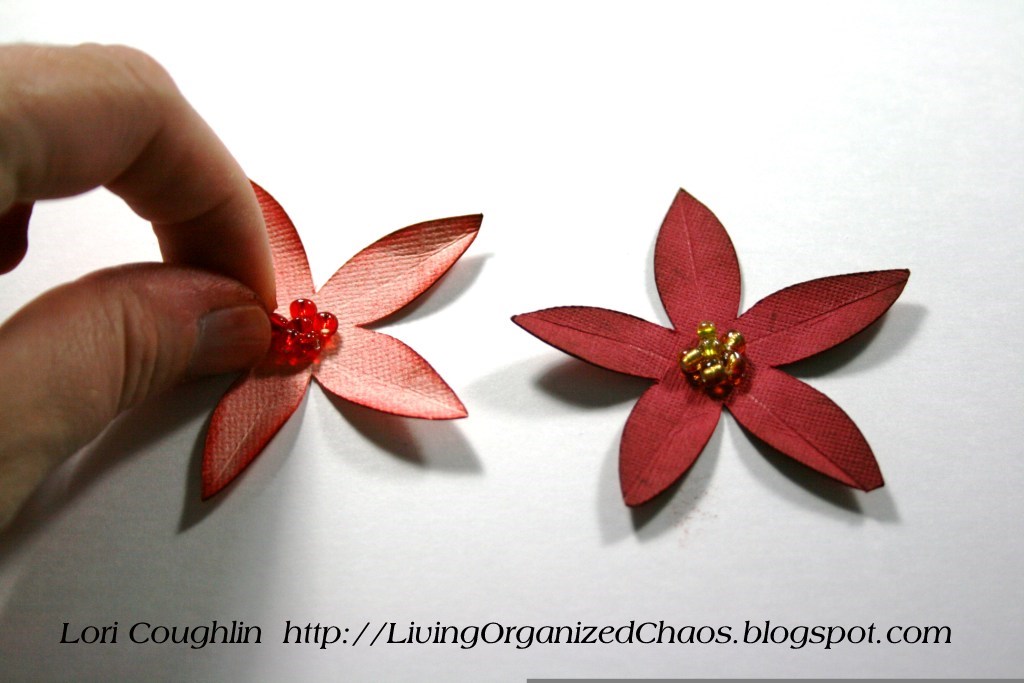
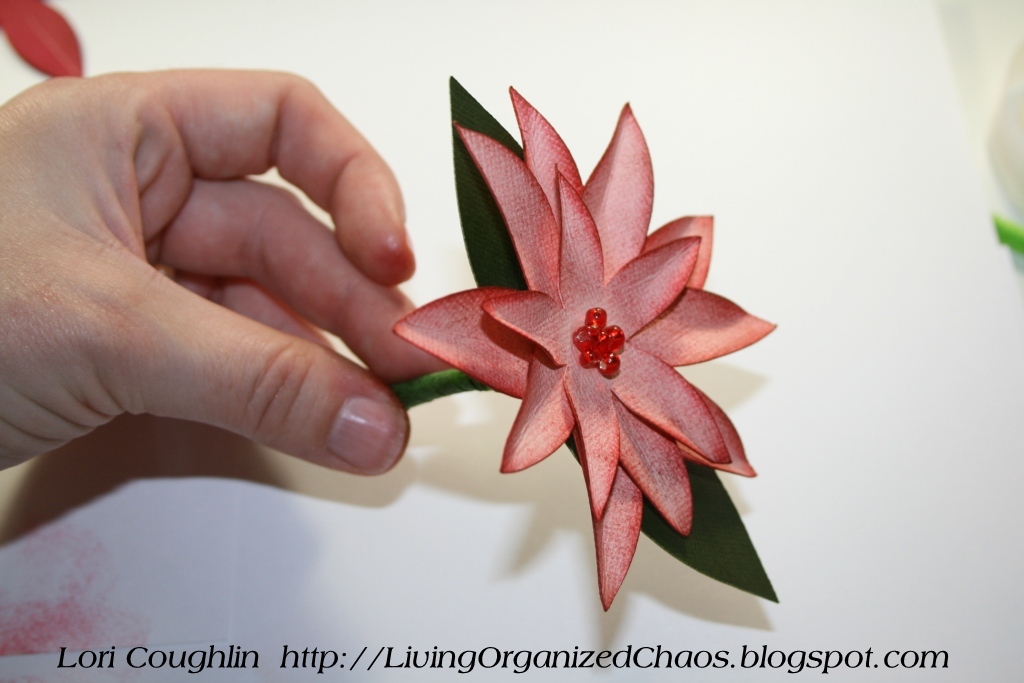
I also used the bird cut from the Storybook Cartridge for the tree centerpiece, adding about 8 birdies to the branches.  To add a little more detail to the tree, I also cut about 35 flowers from the Florals Embellished Cartridge "Flower7 (+shift+Layer1)".  I cut a slit in each one to the center, overlapped the cut edges and glued, making them 3D.  Then I glued a pearl in the center of each and attached to the branches.
For napkin decorations (instead of napking rings), I folded the napkins using a "bird nest napkin folding" tutorial I found HERE.  I placed a twig in the center of each, and then a small grapevine birds nest complete with a little birdie (supplies from Hobby Lobby).  Isn't he cute?!?!
And here is the table all set up!  I used a bird embellished planter to hold the tree centerpiece, wooden birdhouses, framed bird prints, wicker decorative balls, bird embellished tea light holders and other bird decor from around my house.  To finish the table off, and add a little "treat" for those sitting at my table, I made birdnest cookies!
I must say that I do NOT like coconut, but I made these and tried them and they were actually really tasty!  You can find the recipe HERE.  The "eggs" are Jordan Almonds I found at Wal-Mart.  I put each cookie in a bad and tied with raffia.

The last crafty thing I did was to make prayer verse cards.  I printed three prayer verses onto cardstock, trimmed them into rectangles, inked the edges and stamped a bird image on the center.  These were displayed in a trio of birdhouse place card holders from Willow House (pg. 29 of current catalog). 
So that's it!  Here are some of the other FAB tables my girlies decorated...

Mari & Lindsay: Pink, Black & White
Leslie: Picnic
Nicole: Black, White & Lemons
Charity: Back To School
*I didn't get a photo of Gretchen's table because these were taken before hers was set-up.  :(  It was a great luncheon (with yummy food!) and we had 13 new moms attend!  SUCCESS!!!

Thanks for looking!

10.18.2010

Fall Wine Glass Charms: FCCB Challenge #32 Leaf Theme

This week's challenge at Fantabulous Cricut is to create a project using a leaf for Fall!
I haven't made wine glass charms in a while, and thought this was the perfect opportunity to make some new ones to celebrate this gorgeous season!  They're soooooo easy and really turned out pretty cute!  To make the leaves, I used the Storybook cartridge and cut the leaf (shift "B") out of clear shrink plastic at 2 1/2" three times.  I inked each leaf using a different color of Adirondack (Tim Holtz) alcohol ink with a sponge dauber.  Then I punched a hole at the top of each with a standard size hole punch.

To shrink the plastic, I used my heat gun.  The two sides of the leaves wanted to overlap a little while shrinking and not lay completely flat, which actually made them look a little more "realistic" and less one-dimensional.  One shrunk, I added them to a silver ring and added some coordinating glass beads and the ring of leaves to a metal charm loop.

That's it!  Hope you check out Fantabulous Cricut's FANTABULOUS prize for this week and enter your own Fall leaf project for your chance to win!

Have a creative day!  :)

10.11.2010

Altered Wall Clock: FCCB Challenge #31--"On The Wall"!

This week's challenge at FCCB is called "On The Wall": create something to hang on the wall!  I have been needing a clock for the Noise Maker's bedroom and I've had this clock sitting around in a closet for a while, so I figured I'd do-it-up "Cricut style", using the Boys Will Be Boys cartridge.  Can I just tell you how much I LOVE this cartridge????  Sooooo fun for little guys!

I cut circles for each number, and added the numbers for 12, 3, 6, 9 (you know because I can barely tell time as it is, much less without ANY numbers to reference!).  Then I just chose images from the cartridge and cut them out with layers in coordinating colors and slapped them on the circle of patterned paper I cut to fit the clock face.

Now taking the hands off and putting them back on was a little tricky.  Took me a while to figure out.  But it's back together now and I think it turned out pretty cute.  Be sure to head over to Fantabulous Cricut and enter your own handmade wall decoration for your chance to win this week's prize!

Happy Crafting!!!  :)

9.21.2010

DIY Party & Holiday Decor By OhMyGluestick!

I know sooooo many people who say they aren't "crafty" and wouldn't know where to start on handmade party and seasonal decor.  Well, if you like the idea of having a "handmade" component to your party decor, but don't know how to go about doing that, I have a solution!

My friend, Tommie, from Oh My Gluestick designs the most AMAZING graphics that you can buy, cut/punch out and use for your own parties and seasonal decorations!  She can make custom invitations and then design party circles, treat bag toppers, and more...all coordinating in the color/theme you choose! 

The best part about it is that she emails you the graphic and for one (VERY reasonable) price, you can print them off as many times as you want!  This saves you from having to start from scratch, yet allows you to have the hands-on experience of making your decorations, all without breaking the bank!
For the Party Circles, just use a scallop or circle punch to punch them out and then glue to popsicle sticks or hang from ribbon as tags or decorations:

From this:
To this:
Or this:
HERE is a tutorial on how to use the Party Circles, from OhMy Gluestick.

For the Treat Bag Toppers, just print, fold in half and attach to the top of a treat bag for a custom, coordinating party favor!
How easy is that???

Other products offered by OMG include water bottle labels, party hats, banners, door decorations, cake toppers, and of course invitations and announcements.  Visit OMG's Etsy shop HERE for more info!

**All images are from Oh My Gluestick and are copyrighted.**

9.17.2010

Fall Pumpkin Topiary

Fall is soooooooo my favorite time of year!  I love the weather, the colors, the festivities AND the decorating!  This year, I don't have a plant in the urn on my front porch.  Poor thing didn't stand a chance in the Texas heat!  So I decided to make a pumpkin topiary to dress up my front porch.

I got all supplies for this topiary at Michaels.  The pumpkins were half off this week.  Because the white ones were so stark (and still look that way in the photo, though they're not) I used an antiquing medium mixed with several drops of brown re-inker and coated each pumpkin with it.  It gives an aged or slightly distressed/worn look.  I hot glued those together (after cutting off the stems) and added leaves between, where the hot glue was exposed. 

I didn't have enough leaves so I used my Cricut (Stretch Your Imagination, Wild Card) to cut some more.  I sprayed the leaf die cuts with water, scrunched them up and then dried them with my heat tool.  I inked the raised portions and the edges and they looked like beautiful fall leaves!  I hot glued those to a grapevine that I wrapped around the pumpkins.  I also added some brown raffia, twisted around the grapevine.
I set it in the urn, added some moss around the edges (sprayed with Ortho Max...no bugs allowed!!!) and I now have a pretty cool-looking decoration on my porch!

Thanks for looking and have a creative day!  :)

7.19.2010

Fantabulous Cricut Challenge #19: Christmas in July!

This week's Fantabulous Cricut Challenge is: Christmas in July!  We were asked to make a Christmas-themed project.  I decided to make a poinsettia "plant".  :)

I started from scratch on this one...so I decided to make up a little photo tutorial, in case anyone is interested!!!  Here we go:

Step 1:  Cut flowers from Accent Essentials.  Each flower is made up of three die-cuts, cut at 2 1/2", 3 1/4" and 3 1/2" ("Accent33" on shift mode).  Punch a very small hole in the center of each of the larger cuts.

Step 2:  Score petals and fold.  Using a bone folder or other scoring tool, make creases along each petal.  Gently fold up along the score lines.
Step 3:  Ink as desired.  I like lots of inking so I used a dark red to ink the red flowers, and a combination of medium and dark red on the pink flowers.
Step 4:  Attach flower centers.  I used Glossy Accents, and adhered yellow and red seed beads in clusters in the center of each of the smallest flowers.
Step 5: Attach pipe cleaners.  I cut each pipe cleaner into thirds.  I stuck one end through the small hole in the flower, bent over the top and attached it to the flower with a glue dot.
Step 6:  Layer remaining two flowers on top of large based flower with glue dots.  Bend up petals as you go for added dimension.
Step 7:  Attach leaves.  Cut "Accent26" at 4".  Cut it in half to form two sets of leaves.  Using a glue dot, attach one of the cut ends to the other cut end:
Step8:  Thread pipe cleaner through leaves, bend leaves as desired and wrap pipe cleaner with floral tape.
Step 9:  Make a "pot" of poinsettias by placing all of your poinsettia flowers into a pot filled with floral foam.  Hot glue if necessary.
Hope you enjoyed this project!  Be sure to head over to FCCB and look at the other fabulous Design Team projects!  You'll get in "Christmas Crafting Mode" for sure!  And don't forget about the FAB prizes up for grabs, including CRICUT CARTRIDGES!!!  :)

Happy crafting!

6.28.2010

Fantabulous Cricut Challenge #16: Fourth Of July Pinwheel

This week's challenge at FCCB is all about Independence Day:  Create a 4th of July project adding a star shape.  I LOVE the 4th of July.  It just brings back memories of being a kid, having swimming races and coin dives at the neighborhood pool, eating fried chicken (that was a tradition every year) and then going to the river to watch fireworks and play card games until it was too dark to see anymore...all with family of course, which was the most important thing. 

In honor of this holiday, I wanted something that was whimsical and fun, but still incorporated the tradition red, white and blue.  A pinwheel fit the bill perfectly!  This pinwheel was made with Sure Cuts A Lot (SCAL).  I found a FREE .svg file HERE and just added my own twist.  Instead of a double flower center, I added a blue star (to meet the challenge criteria) which I cut from my Cricut A Child's Year cartridge.  You can't see it very well in the photo but the center is stamped with "Happy 4th of July" (CTMH).  The papers used are from the Blue Ribbon collection by CTMH. 

This project is really simple.  The hardest part was locating my small drill bit!  :)  You'll need the following supplies:
wood dowel (with small hole drilled in one end)
craft wire
2 small beads
glue/Terrifically Tacky Tape
eyelets/eyelet tool
ribbon

There is a video tutorial on the page with the .svg download (linked above) on how to make these and it's pretty simple to follow along with.  Hope you enjoy this project!

Be sure to check out FCCB's Design Team projects over at Fantabulous Cricut...lots of fun 4th of July projects to feast your eyes on!  To be eligible for this week's prize, link up your own 4th of July/star project by next Sunday!

Have a creative day!  :)

6.23.2010

"TuTu-Cute" Memory Boards

I LOVE GREENBEAN CRAFTEROLE!!! 
(No, that's not a typo)

"Greenbean's Crafterole" is one of my newest faves in Blogland.  This chick is seriously like the most creative and innovate crafter ever!  She can come up with the neatest projects using things you'd have never thought of!  Not too long ago, I hopped over to visit and found her SUPER-CUTE "tutu-cute chalkboards" (HERE) along with a tutorial!  I just couldn't resist...

I did modify this project just a little...the Mess Maker has been needing a memory board for a LONG time and I decided that instead of painting canvases to make chalkboards, I would use cork/MDF combo bulletin boards and cover them with fabric and ribbon to make memory boards.  Here is the result:
I made three of them because they are somewhat small (11x14).  The dresses are hanging on some flower pegs I found at Hobby Lobby and painted in coordinating colors.  She's not into ballet yet but she IS into princesses and she thinks they are princess dresses.  Works for me!

Thanks Greenbean...you've inspired me yet again!  :)

It's been a while since I've entered any "challenges" or linky parties, but I've decided to link this one to "Me & My Bucket's" What Are You Working With Wednesday...HERE.

5.24.2010

FANTABULOUS CRICUT Challenge #11: Flowers For May...

This week's challenge at Fantabulous Cricut is "Flowers For May": use at least three flowers on a project.  I made this birthday cake box and added three dimensional flower accents!

For this project, I used the Tags, Bags, Boxes and More cartridge to cut the box and the small tag.  I used Accent Essentials to cut the scallop edge border and the flowers.

Each flower has 5 layers, cut at 2" (2), 1 1/2" (2) and 1" (1).  I embellished each flower by adding a rhinestone center and rolling the petals over my stylus to curve them.  I used a standard size hole punch to punch through the center of the pink flower, and just slid it down over the candle and glued in place.

To finish, I stamped "Happy Birthday" (CTMH), attached the tag with some narrow ribbon and adhered "snowball" pearls to the scallop edge.

Be sure to head over to FCCB for some fabulous Design Team projects and inspiration!

Have a creative day!!!  :)

5.18.2010

Monkey Mobile For The Noise Maker's Room

The Mess Maker has had a ribbon mobile in her room since almost day one and I decided that (a year later) it was time for the Noise Maker to have one, too!  Since he has animals all over his room, I thought the monkey swinging from the vine from Create a Critter would be perfect!

I cut out 20 vines using the "Fit To Page" function and adhered two together to make 10 long vines.  I hot glued them to the inside of an painted embroidery hoop.  Then I cut out the monkeys and hot glued them onto the vines.  To finish, I used Design Studio to weld three bananas together to form "bunches" and hot glued those randomly over the vines.

Then I hung it onto his light with green ribbon.  That's it!  Thanks for looking and have a creative day!  :)