CLICK HERE FOR FREE BLOGGER TEMPLATES, LINK BUTTONS AND MORE! »

1.04.2010

Toilet Paper Roll Mini Album (CTMH Caboodle Collection)

This is another mini album made out of toilet paper rolls.  I just love these!  When people ask me what I do to save the environment, I say I recycle and make toilet paper roll albums.  HAHAHAHA!
This one is made with the new CTMH Caboodle collection which is super-fun and "Spring-y".  I'll be teaching a class on this one later this month.
I used my Cricut to cut the tags (inserted inside the flattened rolls) from TBBM which allows for extra photos/journaling/storage.  I also used WIMG to cut the flowers.
I stamped two journaling blocks (CTMH My Acrylix "Frame Of Mind"), matted them with coordinating cardstock and cut them out, then punched holes in them and added them between the pages of the album.
Thanks for looking!  :)

1.03.2010

My Creations Acrylic Album (Topstitch Collection)

This is an album I made for an upcoming class I'm teaching...it's the CTMH My Creations Acrylic Mini Album and the new Topstitch paper collection.  I just LOVE LOVE LOVE this color and pattern combo!  And I'm super-happy with the way this album turned out.  Can't wait to add photos/journaling!
I used the coordinating "Love Is In The Air" My Acrylix stamp set that came with the Topstitch Workshop on the Go as well as the new "Charmed" My Acrylix stamp set. 
I used my Cricut to cut circles from coordinating cardstock to adhere to the tabs.  Then I added stamped images, paper blooms, buttons and die cut flowers to accent them.
I added CTMH "Love Letters" and "Love Story" rub-ons in Chocolate throughout the album and on the cover as well.
I used my Crop-A-Dile to punch holes in the ends of the smaller pages to make "tags" and then tied ribbon through the holes.  These will make great journaling spots.
I added ribbon (craft supply) to the binder rings as well as through the buttons, tags and around the cover.  I also used coordinating Chocolate CTMH brads and buttons in Chocolate and Colonial White.

I think this album is absolutely perfect to hold photos of the Mess Maker and Noise Maker...both pink and blue to represent each of them!  :)

Thanks for looking!

Best Ever Banana Nut Bread!


Thought I'd take a break from the papercrafting for a moment and share with you a FABULOUS recipe.  I was sitting at the table eating dinner tonight and noticed the extremely over-ripe (i.e. black) bananas in my fruit basket.  It reminded me of my most favorite banana bread recipe which I haven't made in forever!

This recipe is originally from a lady named Margot Ross, who submitted it to the Tulsa Ballet Theatre Guild for an annual cookbook (I suppose for a fundraiser for the ballet) called Nutcracker Sweets in 1983.  My mom had this cookbook and cooked from it occasionally and so did my grandma.  When my grandma passed, this was one of the cookbooks I was given.

I've made this recipe so many times that the book automatically opens to this page!  The best part about it?  It's E-A-S-Y!!!  I can barely type right now as I'm inhaling the aroma of this heavenly treat...  :)

Banana Nut Bread
Ingredients: 
3 ripe bananas
1 C sugar
1/2 C shortening
2 eggs
1/2 C water
1 tsp. baking soda
2 1/2 C flour
1 tsp. baking powder
pinch of salt
1/2 C chopped pecans (I use walnuts)

Mash bananas with sugar and shortening (I use my Kitchenaid mixer).  Mix in all ingredients and bake at 350 degrees for 1 hour in a greased loaf pan (I use three mini-loaf pans).  That's it! 

If you try it, let me know what you think!

Just Buggin Challenge #18: Mickey & Friends Centerpiece (AND a Minnie Mouse Cake, Too!)

This week's Just Buggin Challenge #18 is called "In The Shadows":  use the shadow or blackout feature on your project.


The Mess Maker's third birthday party was this past weekend and she just HAD to have a Mickey theme!  I borrowed the Mickey Font cartridge from my AWESOME and talented friend and got to work on this centerpiece.  I used the shadow feature on the "3"s to add definition, and then punched some holes in white cardstock using a standard hole punch and added those circles to the "3"s.

Then, using the blackout feature, I cut each character's face from black cardstock.  I used the facial details feature for each character's face in the appropriate colors of cardstock.  I also cut an additional blackout of each character's face in black so that when I attached the faces to the lollipop sticks, I could cover up the stick by adhering the additional layer on the back.

I inserted each stick into floral foam inside the red pot and added a silver spray and twisted pipe cleaners (wrapped loosely around a ballpoint pen and then attached to lollipop sticks).  For additional detail, I added large red sequins to the twisted pipe cleaners.  Lastly, I tied a black and white polka dot bow around the pot.

In addition to the centerpiece, I also altered some plain red paper plates by adding a Minnie hat to the edge, and made a Minnie Mouse cake, inspired by this cake I found while doing a Google Images search for Minnie cakes:
The white circles, black Minnie mouse heads, mini red bows, large black circles (ears) and large white bow were all formed out of gumpaste (by hand, not Cricut....though I TRIED and TRIED to get my Cricut to do this for me!!!).  The black balls around both layers of the cake are Sixlets that came in a bag of just black, also available in other colors, at Hobby Lobby.  This project made me realize that I am DEFINITELY not a cake decorator...HAH!  Think I'll just stick to paper projects!!!  :)

Thanks for looking!

CTMH Dry Erase Board (Silhouette Collection)

This project was designed by my fellow CTMH consultant The Goofy Scrapper and I want to make sure she gets full credit for this project!  I've been wanting to make these for a while but couldn't decide exactly how I wanted to do it...until I saw hers!!!  :)

This dry erase board is made with a cheapo 8x10 frame and some GORGEOUS CTMH papers from the Silhouette collection, along with December's Stamp Of The Month (Notice The Details) and the Chocolate Alphabet (small).  It's almost an exact copy, with just a few small differences in the small embellishments.

We'll be making these at this month's Home Decor Club meeting...can't wait!!!
Thanks for looking!  :)

1.02.2010

CTMH My Creations 6x6 "You Rock" Accordion Album

Something about the new CTMH "You Rock" paper collection screams "TEENAGER" to me!  It's super-fun, bright but a little grungy...everything a teenager exudes.  :)
This is a class I'll be teaching this month.  The layout for the pages come from the CTMH Reflections IV 6x6 Scrapbook Program.  I've had this template since I started scrapbooking with CTMH about 8 years ago!  I haven't pulled this program out in years and for some reason I decided it'd be perfect for this project.
This program leaves the album pretty open-ended, which is good for those that aren't sure exactly what photos to use and how they want to place them right when they're making the album.
Thanks for looking!

CTMH Veranda Collection Accordion Gift Purse

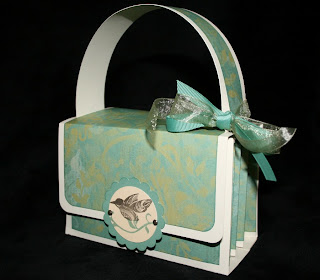
Here's another accordion purse I made using Close To My Heart's new Veranda collection.  I'll be teaching a class on this one this month!  The original design is by Maria Bell of Stampin Inspirations.

Thanks for looking!  :)

CTMH Calendar/Planner with Boom-Di-Ada

I recently taught a class on this planner, which was based on a design by my upline.  This planner is made with Close To My Heart supplies, including the My Creations 3-Ring Binder, Boom-Di-Ada papers, My Acrylix Chocolate Alphabet (small), My Acrylix The Works Alphabet set and My Acrylix Beautiful Flourish set, along with CTMH Exclusive Inks pads.
I matted each calendar page on some old envelopes I've had laying around for about 8 1/2 years (they're extras from my wedding invitations)!!!  The envelopes can hold receipts, tickets, reminders or anything else you need to keep organized by month.
This binder has 5 sections, so I included sections for birthday/anniversary card reminder lists and shopping lists.  To complete this album, I adhered a notepad to the inside back cover (my upline's idea) which can be removed and replaced when empty!
When the year is up, just add more invitation size evelopes with new calendar pages and it's ready to go for the next year!

Thanks for looking! 

12.31.2009

Note Card Set with Gift Box


Since I mailed this Christmas gift today (yes, late...very late) to my friend who lives out of state, I decided I'd take my chances on posting this, hoping she wouldn't check my blog in the next couple of days.  :)  I had the cards done, I just needed to finish the box and things have just been a little crazy around here lately!!!
To make the note cards, I used a white cardstock card base and added a solid cardstock mat which I ran through the Cuttlebug using Divine Swirls.  Then, using a set of five coordinating patterned papers, I cut 1 1/2" x 5" strips of paper and adhered them across the front.  I tied a coordinating ribbon around the mat and adhered it to the card base.

For the embellishment, I cut a scalloped circle (Accent Essentials) out of white cardstock and adhered a coordinating colored cardstock circle (George) which I ran through the Cuttlebug using Swiss Dots.  I cut the initial ("L") from the Storybook cartridge from a different color of coordinating cardstock and adhered it to the circle.  I attached the embellishment next to the bow with glue dots.
I based my storage box on the Accordian Gift Purse tutorial (see this tutorial on my original post here), making a few minor adjustments.  I made the base of the box the same, but did not add a handle.  I also didn't use the accordian folded side pieces.  Instead, I cut a 3" x 5" (x2) piece of cardstock, added patterned paper and then scored on both ends of the long sides at 1".  Then I just adhered the 1" edges inside the box on both sides to make the side walls.

To finish, I tied a ribbon around the top of the box, added an additional scallop circle embellishment to the front of the box and closed the box using adhesive-backed Vel-cro.

I loved making this project.  It would be so simple to modify for any theme or occasion.  I definitely plan to make more!  Hope she likes it!!!  :)

12.30.2009

Red/Black Snowflake "Thanks" Card

Each year, the day after Christmas, I get to work on my thank you notes for the wonderful and thoughtful gifts my family and I received over the holidays...this year I got started a couple of days late, but I finished them today and I'll be filling them out tomorrow and (hopefully) mailing them by Jan. 1.  Whew!!!  :)

These thank you's were made with the Magic Of The Season paper pack from Hobby Lobby.  I just LOVE the papers in this pack and the awesome black/red/cream color combo!  I used a cream card base, cut black cs slightly smaller than the base, and then cut the red snowflake pattern slightly smaller than the black cs (and inked the edges in black).  I cut a 1" x 5" strip of the cream snowflake pattern and used my scallop edge scissors to trim both sides (I inked the edges of this as well).  I adhered the strip in the middle of the card.

For the embellishment, I used the Home Accents Cricut cartridge and cut a snowflake at 2 1/2" out of black cs.  I used black glitter glue to cover the top outer edges of the snowflake, let that dry, and then layered a cream flower over it.  I used cream satin ribbon to tie a bow and stamped "Thanks" (CTMH "Thank You" #D1361) on each tail of the bow using black Staz-On ink (CTMH #Z888) and attached it to the snowflake/flower with a large black brad.

Thanks for looking!  :)

12.29.2009

Minnie Mouse Birthday Invitations


The Mess Maker is getting ready to turn three (where has the time gone???) and she requested a Mickey/Minnie theme for the party we had while visiting family out of town.  Before we left, I searched the internet for some ideas and came across this example which was oh-so-cute and oh-so-EASY...so I decided to scraplift (my results are pictured above)!

To make the invites, I cut a Mickey Head from the Mickey Font cartridge, then cut a smaller red circle using George to mat the wording.  The wording was done in Word, printed on white cardstock, then cut out using a circle cutter, slightly smaller than the red circle.  I found these great Mickey Fonts by searcing Google (can't remember the site!).

To finish the invites, I tied a red polka dot ribbon in a bow, cut a small white cardstock flower using George and attached them with a red flower brad.  These were the quickest invites I've ever made!!!

Thanks for looking!  :)

P.S.  Be on the lookout for a Mickey & Friends centerpiece and a Minnie Mouse cake...to be posted next weekend!

12.28.2009

Baptism Card

My sister's first child (who is now my Goddaughter!) was baptized this weekend and I wanted to make a special card for the occasion.  Unfortunately, I didn't plan ahead and since I was out of town visiting family, I didn't have my usual stash of supplies and tools. :(

So I looked around on Google Images for an idea and found a card which was originally posted on SplitCoastStampers (LOVE LOVE LOVE their website!)...I decided to try and re-create it with the few supplies I had on hand.

I placed two pieces of white cardstock together and used a ruler to draw lines on one of them to create the outline of the dress (I couldn't fold it in half or the card would have been too small).  I  cut them out and adhered the very top of the shoulders together.  Then, using my scalloped scissors, I cut the sleeves and hem of the dress into a scallop-edge.  I used an adhesive pearl design on the body of the dress and adhered a string of pearls along the neckline with rolled up glue dots.

To finish, I tied a thin white ribbon around the dress and added a sliver cross charm.  Looks pretty similar to the original, but I like the coordinating pearls on the neckline and the body of the dress on this one, and since I didn't have any stamps or embossing powder with me, this adhesive pearl design saved me!!!

This original card, posted by "stampandshout" on SplitCoastStampers, can be found here.


Thanks for looking!!!  :)

12.27.2009

Just Buggin Challenge #17: Altered Mini Calendar

This week's Just Buggin Challenge #17 is called Inky Fingers:  use ink to alter your die cuts!

I found this mini calendar in the dollar bins at Target...I really liked the background pattern but I thought it'd be fun to add a personal touch to it.  :)

I cut a 3" flower and its shadow from George.  Using "Sorbet" CTMH ink, I inked the edges of each flower and lightly sponged the tops.  Using the CTMH Playful Petals stamp set, I added petal-shaped patterns and sentiments onto each petal.  This stamp set is perfect for this flower die cut!  I layered the two die cuts, a silk flower and a brad on top. 

Then I used the CTMH The Works Alphabet stamp set to stamp "2010" onto a strip of cs, also inked on the edges and lightly sponged with ink.  I used a small flourish from Playful Petals to add detail on each end of the date.  The flower and the date strip were adhered to the front cover of the calendar and reinserted into the plastic sleeve.

Thanks for looking!  :)

12.20.2009

Just Buggin Challenge #16: Animal ABC Book

This week's Just Buggin Challenge #16 is called "Santa's Helper":  Make a gift for someone you love!

I decided to make this little Animal ABC Book for the Mess Maker.  The book is actually a mini 4x6 photo album I found in the dollar bins at Michael's!!!  I just cut 26 pieces of 4x6 cardstock and embellished each page as follows:

Using Zooballoo, I cut each animal, its layer and its shadow.  This made each animal really pop off the page.  I added facial and body details with a black marker and adhered them to the pages. 

Then I cut out the lowercase and uupercase letters and adhered them to the pages.  To complete each page, I printed off the names of each animal on my computer, trimmed them into strips and adhered them to the appropriate pages.

Thanks for looking!  :)